转自http://blog.markloiseau.com/2012/05/install-arduino-ubuntu/
Install the Arduino IDE in Ubuntu 12.04
Installing the Arduino IDE in Ubuntu only takes a few minutes. As usual, it’s a better idea to install the Arduino straight from the source, instead of relying on the version in Ubuntu’s repository. While it wasn’t hard to install the Arduino IDE, I noticed that the Arduino GUI was really slow and laggy. This is because the startup script tells Java to use Ubuntu’s GTK look and feel, which makes everything run slowly. It’s easily fixed by changing a single line in the startup script.
Update: In the Arduino 1.0.1 update, “Serial Port” is greyed out. The fix is outlined in the troubleshooting section.
Install the Arduino IDE in Ubuntu
- Install gcc-avr, avr-libc and openjdk-6-jre if you don’t have it already.
- Plug in the board, see where it’s connected
- Download and unpack the Arduino IDEtarball
- Run the IDE
- Select your board model and serial port
- Run a sample program
- Fix the buggy interface (optional)
- Troubleshooting
Everything worked out of the box, other than the interface.
Install gcc-avr and avr-libc
Gcc-avr and avr-libc give your system the tools it needs to compile c into AVR machine code:
If you don’t have openjdk-6-jre already, install and configure that too:
Once those are installed plug in your board and type $ dmesg . It will print the kernel’s ring buffer and show you what USB port your Arduino is plugged into:
According to dmesg, our board is plugged into ttyACM0.
Download and Run the Arduino IDE
Go to the downloads page on Arduino’s download page to get the latest Arduino IDE tarball (.tgz file) for your architecture. My laptop is 64-bit, so I chose accordingly. Once the file was finished downloading, I unzipped and ran it with the following command:
Select your board model and serial port
I’m using an Arduino MEGA 2560, so I went to Tools>Board>”Arduino Mega 2560 or Mega ADK.” At this point, I noticed that the GUI was really slow and hard to use. If you want to fix it before proceeding, exit the IDE and skip to the ”Fixing the Interface” section before proceeding.
The IDE flashed an error about how my board wasn’t accessible over the COM1 port. COM1 usually refers to a 9-pin serial port, and my laptop doesn’t even have one. I went to Tools>Serial Port and selected /dev/ttyACM0, which reflected the output I saw when I checked dmesg.
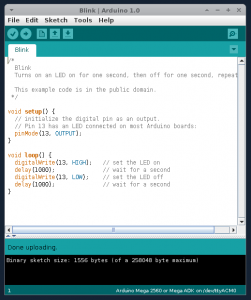
The errors went away, and I went to File>Examples>Basics>Blink and clicked upload. Sure enough, the LED started blinking. You should be ready to start writing and running Arduino programs!
Fix the Arduino IDE to make it run more smoothly in Ubuntu
Exit the Arduino IDE and go to the installation folder (the folder you unzipped from the .tgz file). Edit the “arduino” script in your favorite text editor. To make Arduino use the native Swing windowing instead of forcing the GTK look and feel, which is the cause of the bugginess, change the following line:
Just delete the -D flag and its argument. Personally, I get nostalgic about the old-school Swing look and feel, but either way, it fixed all of the lagginess issues I was experiencing.
My Arduino IDE, running in Ubuntu (using SWT instead of GTK)
Troubleshooting USB and the grayed out Serial Port
When I got the Arduino 1.0.1 update, “Serial Port” was grayed out in the tools menu. Running arduino as root ( sudo ./arduino) resolved the issue, but it’s not an acceptable solution. In my case, serial port was grayed out because my user didn’t have permission to read and write to the device.
I added my user to the dialout group with the command sudo usermod -a -G dialout mark . Usually, that would have fixed it but iserial port was still grayed out.
Changing the permissions on /dev/ttyACM0 to world readable and writeable fixed the grayed out serial port. I ran sudo chmod a+rw /dev/ttyACM0 and the serial port menu worked again.
I’ve noticed that running programs that send lots of data over USB can cause issues with the arduino programming software, making it give errors while uploading code. Holding down the reset button fixed my upload and USB errors in most cases.
Further Reading
If you read nothing else before you start writing programs, look at the official Arduino Reference page. It might be the most concise, complete language reference I’ve ever seen.