系统负载是系统监控工具GNOME里的一个小应用。它能在面板上展示出CPU、内存、网络使用、硬盘I/O等信息
作者: 默默
码农
解决Eclipse中SVN 信息不显示的问题
Eclipse 中使用 svn 插件,原本正常,未作任何更改,最近几天突然eclipse 中查看文件时,文件后面的 版本号 、 文件的状态图标 等等都不见了。以为有插件冲突,卸载了好多其他的相关的插件,不行,卸载了SVN插件重新安装也不行。
检查插件都在,更新,提交等操作都能正常使用,唯独看不到状态了。
经过一番查找,找到问题解决办法。
Windows ,Linux 中
打开 : windows ->preferences->General->Appearance->Lable Decorations 勾选其中的 SVN 项即可。
Mac
打开 : preferences->General->Appearance->Lable Decorations 勾选其中的 SVN 项即可。
mvn报错:No goals have been specified for this build
选择【Run As】-【Maven build】的时候,报:
|
1 2 3 4 5 6 7 |
[INFO] Scanning for projects…[INFO] [INFO] BUILD FAILURE[INFO] [INFO] Total time: 0.109s[INFO] Finished at: Wed Apr 13 11:04:20 CST 2011[INFO] Final Memory: 1M/4M[INFO] ERROR] No goals have been specified for this build. You must specify a valid lifecycle phase or a goal in the format <plugin-prefix>:<goal> or <plugin-group-id>:<plugin-artifact-id>[:<plugin-version>]:<goal>. Available lifecycle phases are: validate, initialize, generate-sources, process-sources, generate-resources, process-resources, compile, process-classes, generate-test-sources, process-test-sources, generate-test-resources, process-test-resources, test-compile, process- test-classes, test, prepare-package, package, pre-integration-test, integration-test, post-integration-test, verify, install, deploy, pre-site, site, post-site, site-deploy, pre-clean, clean, post-clean. -> [Help 1][ERROR] [ERROR] To see the full stack trace of the errors, re-run Maven with the -e switch.[ERROR] Re-run Maven using the -X switch to enable full debug logging.[ERROR] [ERROR] For more information about the errors and possible solutions, please read the following articles:[ERROR] [Help 1] http://cwiki.apache.org/confluence/display/MAVEN/NoGoalSpecifiedException |
eclipse安装的maven插件是m2eclipse,在控制台使用命令mvn compile并未报错。后在pom.xml文件<build>标签后面加上
|
1 |
<defaultGoal>compile</defaultGoal> |
即可。
其实使用命令行时就已经指定了phase,而使用m2eclipse的【Run As】-【Maven build】时并未为其指定goal或phase,所以才报这个错误。
Struts2使用execAndWait在Action中调用getText报告java.lang.NullPointerException
使用 Struts2 编写页面,遇到一个要长时间运行的接口,因此增加了一个execAndWait ,结果在 Action 中调用 getText的时候报告异常
|
1 2 3 4 5 6 7 8 9 10 11 12 13 14 |
java.lang.NullPointerException at com.opensymphony.xwork2.util.LocalizedTextUtil.findText(LocalizedTextUtil.java:361) at com.opensymphony.xwork2.TextProviderSupport.getText(TextProviderSupport.java:208) at com.opensymphony.xwork2.TextProviderSupport.getText(TextProviderSupport.java:123) at com.opensymphony.xwork2.ActionSupport.getText(ActionSupport.java:103) at com.infy.action.LoginAction.execute(LoginAction.java:19) at sun.reflect.NativeMethodAccessorImpl.invoke0(Native Method) at sun.reflect.NativeMethodAccessorImpl.invoke(NativeMethodAccessorImpl.java:39) at sun.reflect.DelegatingMethodAccessorImpl.invoke(DelegatingMethodAccessorImpl.java:25) at java.lang.reflect.Method.invoke(Method.java:597) at com.opensymphony.xwork2.DefaultActionInvocation.invokeAction(DefaultActionInvocation.java:450) at com.opensymphony.xwork2.DefaultActionInvocation.invokeActionOnly(DefaultActionInvocation.java:289) at org.apache.struts2.interceptor.BackgroundProcess$1.run(BackgroundProcess.java:57) at java.lang.Thread.run(Thread.java:662) |
查询了很多评论,最终找到原因跟解决方案,具体解释在 http://stackoverflow.com/questions/16692658/execandwait-interceptor-not-redirecting-to-success-page-after-waiting
execAndWaitcauses the action to be executed in a new thread.- Since
ActionContextisThreadLocal, the new thread will not get the values stored in the parent thread version ofActionContext. Every thread has a unique version ofActionContext getText()will throw a NPE when it tries to execute in the new thread because it depends onActionContext
简单解释一下,就是说
execAndWait 会导致执行的Action 在另外一个线程中被执行,而getText 依赖 ActionContext ,他从 ActionContext 中获得当前的Locale 从而根据语言的不同加载不同的文字,可是,由于ActionContext 是ThreadLocal 的,而execAndWait 新开线程的时候并没有把父线程的ActionContext 传递给子线程 结果导致在新开的子线程中的ActionContext中的数据都是null ,因此出现异常信息就不足为怪了。
解决方法为
To fix this, you need to copy the parent threads ActionContext into the execAndWait thread. You can do this by extending the BackgroundProcess class, implementing the beforeInvocation()and afterInvocation() methods, and extending ExecuteAndWaitInterceptor, implementing the getNewBackgroundProcess() method.
代码例子如下,注意,原文中作者的代码存在多线程同步问题,具体体现在
|
1 |
beforeInvocation |
被调用的时候,得到的 context 为null ,导致注入失败。
因此需要重载两个类,来解决这个问题
|
1 2 3 4 5 6 7 8 9 10 11 12 13 14 15 16 17 18 19 20 21 22 23 24 25 26 27 28 29 30 31 32 33 34 35 36 37 38 39 40 41 42 43 44 45 46 |
import org.apache.struts2.interceptor.BackgroundProcess; import org.apache.struts2.interceptor.ExecuteAndWaitInterceptor; import com.opensymphony.xwork2.ActionContext; import com.opensymphony.xwork2.ActionInvocation; public class ExecAndWaitInterceptorEx extends ExecuteAndWaitInterceptor { private static final long serialVersionUID = -4456744368791451159L; /** * {@inheritDoc} */ @Override protected BackgroundProcess getNewBackgroundProcess(String arg0, ActionInvocation arg1, int arg2) { ActionInvocationEx aActionInvocationEx = new ActionInvocationEx(arg1,ActionContext.getContext()); return new BackgroundProcessEx(arg0, aActionInvocationEx, arg2); } private class BackgroundProcessEx extends BackgroundProcess { public BackgroundProcessEx(String threadName, ActionInvocation invocation, int threadPriority) { super(threadName, invocation, threadPriority); } private static final long serialVersionUID = -9069896828432838638L; /** * {@inheritDoc} * @throws InterruptedException */ @Override protected void beforeInvocation() throws InterruptedException { ActionInvocationEx aActionInvocationEx = (ActionInvocationEx)this.invocation; ActionContext context = aActionInvocationEx.getContext(); ActionContext.setContext(context); } /** * {@inheritDoc} */ @Override protected void afterInvocation() { ActionContext.setContext(null); } } } |
|
1 2 3 4 5 6 7 8 9 10 11 12 13 14 15 16 17 18 19 20 21 22 23 24 25 26 27 28 29 30 31 32 33 34 35 36 37 38 39 40 41 42 43 44 45 46 47 48 49 50 51 52 53 54 55 56 57 58 59 60 61 62 63 64 65 66 67 68 69 70 71 72 73 74 75 76 77 78 79 80 81 82 83 84 85 86 87 88 89 90 91 92 |
import com.opensymphony.xwork2.ActionContext; import com.opensymphony.xwork2.ActionEventListener; import com.opensymphony.xwork2.ActionInvocation; import com.opensymphony.xwork2.ActionProxy; import com.opensymphony.xwork2.Result; import com.opensymphony.xwork2.interceptor.PreResultListener; import com.opensymphony.xwork2.util.ValueStack; public class ActionInvocationEx implements ActionInvocation { /** * */ private static final long serialVersionUID = 1L; private final ActionInvocation mActionInvocation; private final ActionContext context; public ActionInvocationEx(ActionInvocation aActionInvocation,ActionContext aContext) { mActionInvocation = aActionInvocation; context = aContext; } public Object getAction() { return mActionInvocation.getAction(); } public boolean isExecuted() { return mActionInvocation.isExecuted(); } public ActionContext getInvocationContext() { return mActionInvocation.getInvocationContext(); } public ActionProxy getProxy() { return mActionInvocation.getProxy(); } public Result getResult() throws Exception { return mActionInvocation.getResult(); } public String getResultCode() { return mActionInvocation.getResultCode(); } public void setResultCode(String resultCode) { mActionInvocation.setResultCode(resultCode); } public ValueStack getStack() { return mActionInvocation.getStack(); } public void addPreResultListener(PreResultListener listener) { mActionInvocation.addPreResultListener(listener); } public String invoke() throws Exception { return mActionInvocation.invoke(); } public String invokeActionOnly() throws Exception { return mActionInvocation.invokeActionOnly(); } public void setActionEventListener(ActionEventListener listener) { mActionInvocation.setActionEventListener(listener); } public void init(ActionProxy proxy) { mActionInvocation.init(proxy); } public ActionInvocation serialize() { return mActionInvocation.serialize(); } public ActionInvocation deserialize(ActionContext actionContext) { return mActionInvocation.deserialize(actionContext); } /** * @return the context */ public ActionContext getContext() { return context; } } |
写完之后,在struts.xml 中配置一下拦截器,覆盖掉默认的拦截器,下面是我的配置例子
|
1 2 3 4 5 6 7 8 9 10 11 12 13 14 15 16 17 18 19 20 21 22 23 24 25 26 |
<?xml version="1.0" encoding="UTF-8"?> <!DOCTYPE struts PUBLIC "-//Apache Software Foundation//DTD Struts Configuration 2.0//EN" "http://struts.apache.org/dtds/struts-2.0.dtd"> <struts> <constant name="struts.i18n.encoding" value="utf-8"></constant> <constant name="struts.multipart.maxSize" value="20971520"/> <constant name="struts.devMode" value="true" /> <package name="FaeSupport" namespace="/" extends="struts-default"> <!-- 安装自定义的 execAndWait 拦截器,覆盖掉系统默认的,目的是解决在 execAndWait 出现的时候,Action调用 getText 报java.lang.NullPointerException--> <interceptors > <interceptor name="execAndWait" class="com.FaeSupport.Interceptor.ExecAndWaitInterceptorEx"/> </interceptors > <action name="faesupport" class="com.FaeSupport.Action.FaeSelAction" method="SelParametersCheck"> <interceptor-ref name="defaultStack"/> <interceptor-ref name="execAndWait"> <param name="delay">1500</param> </interceptor-ref> <result name="wait">/build_wait.jsp</result> <result name="success">/build_wait.jsp</result> </action> </package> </struts> |
为Struts 2应用程序创建进度条(等待页面)
Struts 2模拟进度条的原理
对于一些需要较长时间才能完成的任务,在Web开发中,会由HTTP协议会因为超时而断开而面临许多风险,这是在桌面开发不曾遇到的。Struts 2提供的execAndWait拦截器就是为了处理和应付这种情况而设计的。注意,该拦截器不在"defaultStack"中,所以必须在使用它的动作里声明它,并且必须放在拦截器栈的最后一个。
使用了该拦截器后,动作依然正常执行,只是该拦截器会分配一个后台线程处理动作的运行,并在动作完成之前把用户带到一个"等待"页面。,该页面每隔一段时间刷新一次,直到那个后台线程执行完毕为止。如果用户随后又触发了同一个动作,但顶一个动作尚未执行完毕,这个拦截器将继续向用户发送"等待"结果;如果他已经执行完毕,用户会看到该动作的最终结果。
"等待"结果的行为与"dispatcher"结果的行为很相似,但是要注意的是,"等待"结果对应的视图带有如下的meta标签:
|
1 |
<meta http-equiv="refresh" content="5;url=/Struts2/default_progressbar.action"/> |
该标签的作用就每隔多少秒就重新加载一次同样的URL。"5"是5秒,"url=/Struts2/default_progressbar.action"表示要加载的URL。
Struts 2是一个灵活强大的框架,如果你不喜欢Struts 2提供的默认"等待页面",你也可以自己设计自己的等待页面,若在动作声明中,没有找到"等待"结果,将使用默认值。
execAndWait拦截器
execAndWait拦截器 可以接收以下参数:
- threadPriority:分配给相关线程的优先级,默认值为Thread.NORM_PRIORITY。
- delay:向用户发送"等待"结果前的毫秒数,默认值为0。如果你不想立刻发送"等待"结果,可以将该参数设置为一个值。例如,你想让动作超过2秒还未完成时才发送"等待"结果,需要将其值设置为2000.
- delaySleepInterval:每隔多少毫秒唤醒主线程(处理动作的后台线程)去检查后台线程是否已经处理完成,默认值是100。这个值设为0时无效。
示例:使用默认视图与自定义视图
创建一个动作类,该动作类的工作为挂起30秒:
|
1 2 3 4 5 6 7 8 9 10 11 12 13 14 15 16 17 18 19 20 21 22 23 24 25 26 |
public class ProgressbarAction extends ActionSupport { private static final long serialVersionUID = 7441785390598480063L; private int complete = 0; // 获取进度值 public int getComplete() { complete += 10; return complete; } @Override public String execute() { try { Thread.sleep(30000); } catch (InterruptedException e) { e.printStackTrace(); } return SUCCESS; } } |
配置struts.xml文件:
|
1 2 3 4 5 6 7 8 9 10 11 12 13 14 15 16 17 18 |
<package name="progressbar" extends="struts-default"> <action name="default_progressbar" class="struts2.suxiaolei.progressbar.action.ProgressbarAction"> <interceptor-ref name="defaultStack"></interceptor-ref> <interceptor-ref name="execAndWait"> <param name="delay">1500</param> </interceptor-ref> <result name="success">/state_ok.jsp</result> </action> <action name="customer_progressbar" class="struts2.suxiaolei.progressbar.action.ProgressbarAction"> <interceptor-ref name="defaultStack"></interceptor-ref> <interceptor-ref name="execAndWait"> <param name="delay">1500</param> </interceptor-ref> <result name="wait">/customer_wait.jsp</result> <result name="success">/state_ok.jsp</result> </action> </package> |
测试页面:
|
1 2 3 4 5 |
<body> <s:a href="/Struts2/default_progressbar.action">default_view</s:a> <br /> <s:a href="/Struts2/customer_progressbar.action">customer_view</s:a> </body> |
自定义等待页面:
|
1 2 3 4 5 6 7 8 9 10 11 12 13 14 15 16 17 18 19 20 21 22 23 24 25 26 |
<html> <head> <base href="<%=basePath%>"> <title>My JSP 'customer_wait.jsp' starting page</title> <meta http-equiv="pragma" content="no-cache"> <meta http-equiv="cache-control" content="no-cache"> <meta http-equiv="expires" content="0"> <meta http-equiv="keywords" content="keyword1,keyword2,keyword3"> <meta http-equiv="description" content="This is my page"> <!-- 下面的meta元素才是重点,其他的没什么影响,是IDE自带的 --> <meta http-equiv="refresh" content="3;url=/Struts2/customer_progressbar.action"> <!-- <link rel="stylesheet" type="text/css" href="styles.css"> --> </head> <body> <div> Please wait...(<s:property value="complete"/>)% complete </div> </body> </html> |
最终结果页面:
|
1 2 3 |
<body> OK! </body> |
在浏览器中输入:http://localhost:8081/Struts2/test.jsp,获得如下页面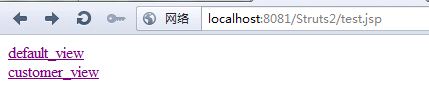
首先点击,"default_view"链接:
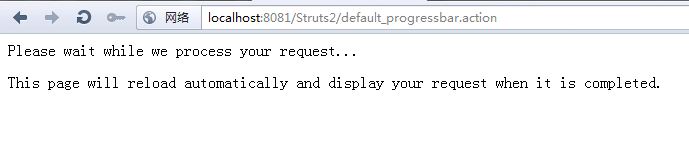
查看它的源代码:
|
1 2 3 4 5 6 7 8 9 10 11 |
<html> <head> <meta http-equiv="refresh" content="5;url=/Struts2/default_progressbar.action"/> </head> <body> Please wait while we process your request... <p/> This page will reload automatically and display your request when it is completed. </body> </html> |
这次点击"customer_view"链接:


这是自定义界面,最后动作执行完毕后,都会获得最终页面

引用自:http://www.blogjava.net/athrunwang/archive/2011/11/18/364200.html
Mac图片圈点软件Skitch
一直想在Mac下面找一个免费的好用的图片圈点,截图,截屏软件,增加点注释啊,画个箭头啊什么简单的功能,只要好用即可,找了半天,总算找到一个好用的软件Skitch。 在Mac商店中搜索Skitch ,然后下载即可。现在是免费的了,被Evernote收购之后就免费了,蛮好用的,强烈推荐。
How To Get The ServletContext In Struts 2
早期版本中可以如下操作
|
1 2 3 4 5 6 7 8 9 10 11 12 13 14 15 |
import javax.servlet.ServletContext; import org.apache.struts2.ServletActionContext; import com.opensymphony.xwork2.ActionSupport; public class CustomerAction extends ActionSupport{ public String execute() throws Exception { ServletContext context = ServletActionContext.getServletContext(); return SUCCESS; } } |
如果报告
|
1 2 |
Caused by: java.lang.NullPointerException at org.apache.struts2.ServletActionContext.getServletContext(ServletActionContext.java:139) |
则代表这个版本的stucts2 中不支持这种写法,貌似2.3.16 版本的就不行,则可以通过实现ServletContextAware 接口来让spring拦截器来完成注入即可。
|
1 2 3 4 5 6 7 8 9 10 |
import javax.servlet.ServletContext; import org.apache.struts2.ServletActionContext; import com.opensymphony.xwork2.ActionSupport; public class CustomerAction extends ActionSupport implements ServletContextAware{ private ServletContext context; public void setServletContext(ServletContext context) { this.context = context; } } |
Ubuntu 13.10 卸载 Apache2 重新安装找不到apache2.conf
Ubuntu 13.10 卸载 Apache2 重新安装后在 /etc/apache2 目录下apache2.conf不存在 或者里面内容为空,解决方法如下
|
1 2 3 4 5 6 7 |
$ sudo apt-get --purge remove apache2 $ sudo apt-get --purge remove apache2.2-common $ sudo apt-get autoremove #找到没有删除掉的配置文件,一并删除 $ sudo find /etc -name "*apache*" -exec rm -rf {} \; $ sudo rm -rf /var/www |
Ubuntu 13.10 Apache 2.2 通过 AJP 整合 Tomcat 7
前置条件为Apache 2.2,Tomcat 7都是通过apt-get install来安装的版本。
|
1 2 3 |
$ sudo apt-get install apache2 $ sudo apt-get install tomcat7 |
1.开启Apache的AJP协议支持,Apache 2.2已经默认在/var/lib/apache2/module目录下面包含了AJP协议模块,只要打开支持就可以了。
|
1 2 3 |
$ sudo a2enmod proxy_ajp $ sudo a2enmod proxy |
2.编辑VirtualHost,在Ubuntu下面这个目录在/etc/apache2/sites-available下面
可以看到default.conf跟default-ssl.conf两个类似的文件,我这边的default.conf莫名的被重命名成了000-default.conf,倒也无妨。
|
1 |
$ sudo vim /etc/apache2/sites-available/000-default.conf |
在
|
1 |
<VirtualHost *:80></VirtualHost> |
之间增加
|
1 2 3 |
ProxyPass / ajp://127.0.0.1:8009/ ProxyPassReverse / ajp://127.0.0.1:8009/ ServerName localhost |
注意,此处的8009端口,要对应下面的Tomcat 7中配置的AJP的端口。
3.修改Tomcat 7的配置文件
|
1 |
$ sudo vim /var/lib/tomcat7/conf/server.xml |
去掉被注释掉的,如果没有则增加
|
1 2 3 4 |
<!-- Define an AJP 1.3 Connector on port 8009 --> <!-- <Connector port="8009" protocol="AJP/1.3" redirectPort="8443" /> --> |
注意是增加或去掉原来的配置信息,不是修改默认的8080端口上的“HTTP 1.1”部分
另外注意,如果直接去掉注释,那么根据The AJP Connector中的介绍说明(注意address部分),如果没有指定IP地址的话,默认是绑定任意地址,这样就导致外网也可以访问这个端口。因此出于安全考虑,我们需要增加这个address的设置,并且绑定到127.0.0.1。最终结果如下:
|
1 2 |
<!-- Define an AJP 1.3 Connector on port 8009 --> <Connector port="8009" protocol="AJP/1.3" address="127.0.0.1" redirectPort="8443" /> |
4.重启Tomcat 7跟Apache 2
|
1 2 3 |
$ sudo service apache2 restart $ sudo service tomcat7 restart |
5.验证是否成功
在Tomcat的ROOT目录(/var/lib/tomcat7/webapps)下面创建一个index.jsp里面随便写点东西即可,不需要是JSP,比如可以写 "Hello JSP"
然后访问http://127.0.0.1/index.jsp如果能正常显示出来,则代表配置成功。
6.如果重启Apache2出现:
|
1 |
Could not reliably determine the server's fully qualified domain name, using 127.0.1.1 for ServerName. |
在/etc/apache2/apache2.conf文件最后加上:
|
1 2 |
#ServerName XXX (XXX 为domain name) ServerName localhost |
7.出于安全原因,禁止外网访问Tomcat的8080端口
只允许Tomcat在本地的8080端口监听即可,修改
|
1 |
$ sudo vim /var/lib/tomcat7/conf/server.xml |
添加 address="127.0.0.1"
|
1 2 3 |
<Connector port="8080" address="127.0.0.1" protocol="HTTP/1.1" connectionTimeout="20000" redirectPort="8443" /> |
重启Tomcat7
|
1 |
$ sudo service tomcat7 restart |
8.Apache2对Tomcat进行反向代理的时候,会发生重定向问题。
配置参考
在Ubuntu 12.04 LTS上安装OpenGrok浏览Android源码
具体的Apache2的配置文件如下:"/etc/apache2/sites-available/default"
|
1 2 3 4 |
#for Tomcat 7 openGrok ProxyPass /AndroidXRef/ ajp://127.0.0.1:8009/AndroidXRef/ ProxyPassReverse /AndroidXRef/ ajp://127.0.0.1:8009/AndroidXRef/ ServerName localhost |
则在正常访问http://www.mobibrw.com/AndroidXRef的时候是正常的,但是在点击里面按钮的时候会报告404跳转错误。ProxyPass后面必须携带"/",否则就会出现404问题。
产生这个错误的原因是:Apache2进行代理的时候更改了URL路径,而Tomcat7并不知道URL发生变化了,因此没有在跳转时候携带Apache2增加的跳转地址。
解决方法是在Tomcat7的配置文件/var/lib/tomcat7/conf/server.xml中的Host字段中增加
|
1 |
<Context path="/AndroidXRef" docBase="source/"/> |
即可。
如下所示:
|
1 2 3 4 5 6 7 8 9 10 11 12 13 14 15 16 17 |
<Host name="localhost" appBase="webapps" unpackWARs="true" autoDeploy="true"> <Context path="/AndroidXRef" docBase="source/"/> <!-- SingleSignOn valve, share authentication between web applications Documentation at: /docs/config/valve.html --> <!-- <Valve className="org.apache.catalina.authenticator.SingleSignOn" /> --> <!-- Access log processes all example. Documentation at: /docs/config/valve.html Note: The pattern used is equivalent to using pattern="common" --> <Valve className="org.apache.catalina.valves.AccessLogValve" directory="logs" prefix="localhost_access_log." suffix=".txt" pattern="%h %l %u %t "%r" %s %b" /> </Host> |
为maven设置镜像解决国内下载依赖时超时的问题
国内访问repo1.maven.org访问不了,导致maven不能下载依赖,解决方法是自己设置maven的mirrors,就是设置镜像:
在~/.m2/目录下建立一个settings.xml文件,内容如下
|
1 2 3 4 5 6 7 8 9 10 11 12 13 14 15 16 |
<settings xmlns="http://maven.apache.org/SETTINGS/1.0.0" xmlns:xsi="http://www.w3.org/2001/XMLSchema-instance" xsi:schemaLocation="http://maven.apache.org/SETTINGS/1.0.0 http://maven.apache.org/xsd/settings-1.0.0.xsd"> <mirrors> <!-- mirror | Specifies a repository mirror site to use instead of a given repository. The repository that | this mirror serves has an ID that matches the mirrorOf element of this mirror. IDs are used | for inheritance and direct lookup purposes, and must be unique across the set of mirrors. | --> <mirror> <id>id</id> <mirrorOf>central</mirrorOf> <name>name</name> <url>http://XXX</url> </mirror> </mirrors> </settings> |
最好是公司或者自己设置的镜像地址,公网地址基本上不怎么靠谱,不是修改了包的内容打广告就是稳定性很差。
注意,如果由于更换代理导致问题,可以尝试删除~/.m2/repository 目录。