解决WordPress 6.x缺少ICP备案链接的问题

早期版本的 WordPress 内置了显示网站备案号的功能(WordPress 5.x 以及之前的版本,参考: 解决WordPress 5.2.3/5.7.2后台ICP备案链接不能跳转到工信部网站(www.miitbeian.gov.cn)的问题),但是升级到 WordPress 6.x 版本之后,这部分功能被丢弃了。 

但是这又是工信部的规定,因此我们需要手工修改代码解决这个问题。

一般都是手工修改当前使用主题的 footer.php,增加工信部相关的配置,如下:

完整的增加位置如下:

参考链接


Urvanov Syntax Highlighter: WordPress 5.6+/PHP 7.4+/PHP 8+ 完全兼容

一直使用  Crayon Syntax Highlighter (Crayon语法显示) 作为 WordPress 的代码高亮插件。但是这个插件已经长时间没有更新维护了,导致无法兼容最新版本的 Wordoress

开发者 urvanov 进行维护的二次开发项目,在 Crayon Syntax highlighter 的基础上进行更新二次开发,解决了CrayonWordPress 5.x 上出现的各种问题。

插件主页: Urvanov Syntax Highlighter,作者在原基础功能上进行了语法语言支持完善等优化,使用下来很赞。

Urvanov Syntax Highlighter

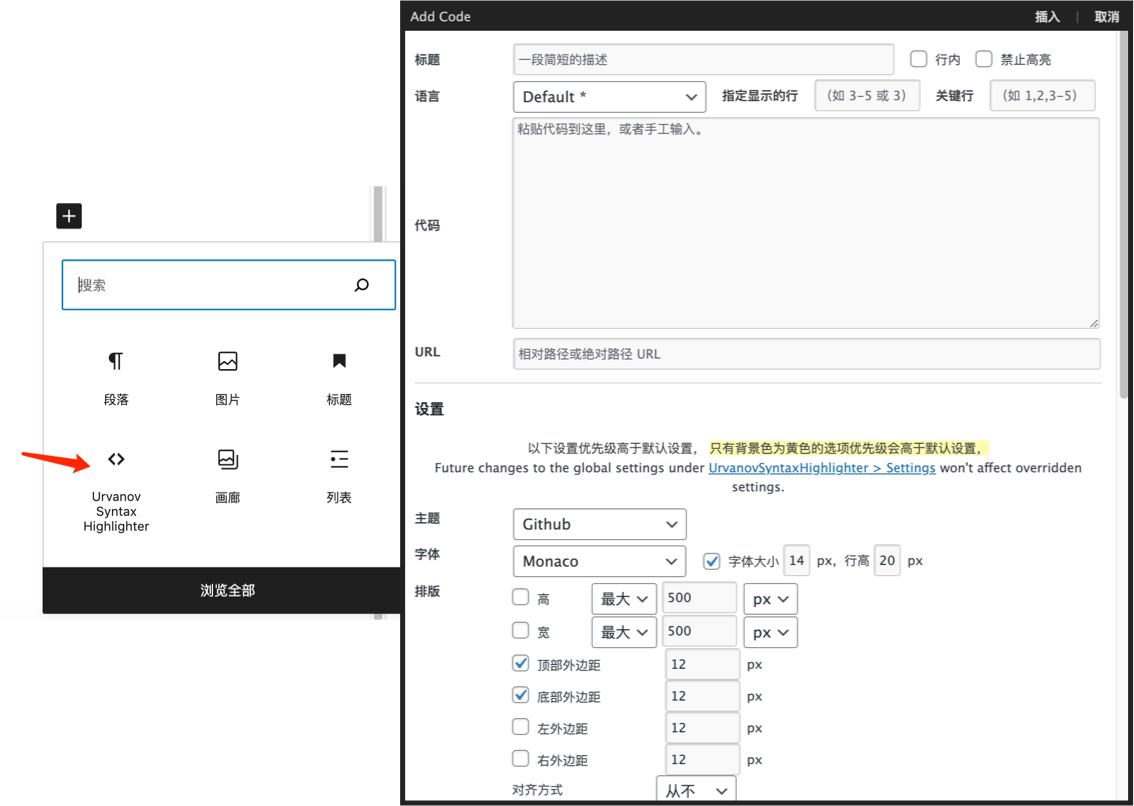
支持经典编辑器和新编辑器,代码块直接插入。使用体验与 Crayon Syntax highlighter相同。

参考链接


WordPress通过自带的Thickbox实现简单的弹出窗口

One simple way of enabling pop-up windows right from your WordPress posts, is by using the Thickbox javascript library that comes with WordPress.

You can link the pop-up window to a HTML input element such as a button, or you can simply link the pop-up window to a HTML hyperlink. Below we show examples of both –

Show Thickbox Example Pop-up 2

How to Add Pop-up Windows to Your WordPress Posts

Step 1

You need to add thickbox to your WordPress post. You can do this by adding the add_thickbox function to the ‘init’ function of your theme. In particular, add the code below to your theme functions.php file.

Step 2

Now we can just add the button right in our post and link it to thickbox by specifying class=thickbox. Click on the HTML tab in your post editor and paste the HTML code below into your post.

Step 3

Finally, we specify the content that goes into our pop-up window by creating a div with id=examplePopup1.

And just like that, we have our pop-up window.

There are a variety of other thickbox options including using iframes, displaying image galleries, and using AJAX content.

Only Include Thickbox as Necessary

While the example above works, it is not the most efficient because you are including the thickbox library into all of your WordPress posts, whether you are using it or not.

Ideally, you only want to include thickbox in those posts that actually require it.

One way to achieve this is by using the is_single or is_page WordPress functions to include thickbox on a post by post basis.

Line 1 – Instead of tying the add_thickbox function to the init action hook, we tie it to the template_redirect action hook instead. This will allow us to properly use the is_single and is_page commands in our hook function.

Lines 4-6 – Only add thickbox to this post which has an id of 2794.

Include Thickbox Based on Post Tags

The solution above works well if you want to include pop-up windows to a small set of posts and pages. However, if you later decide to use pop-ups on a large set of posts, using is_single may quickly become unwieldy.

While you can pass in an array of posts to the is_single function, you will still need to list out the title or id of each and every post that uses thickbox.

A more elegent solution, is to include the thickbox libraries based on post tags.

Line 4 – We only add thickbox for single posts, pages, or attachments.

Line 6 – Get the post tags for the current post.
*Note*, we cannot used WordPress Loop functions at this point because the template_redirect action hook is called before the Loop is fully instantiated. However, query_vars has already been called, so the $wp_query global variable contains the values that we need.

Lines 7-12 – Check for the thickbox tag. If we find it, we add the thickbox library.

Now all we need to do is add the thickbox tag to posts that use the thickbox library and we are done.

参考链接

ubuntu 22.04 WARNING: [pool ***] server reached max_children, consider raising it

最近 WordPress 上传图片的时候,偶尔会发生失败,报错 503。以前比较少,最近越来越频繁,于是跟踪了一下服务器的日志,看到如下报错信息:

查看 PHP 的日志,却找不到任何有用的日志,只看到如下警告:

起初是百思不得其解,按理说应该有相关报错才对。

后来仔细思考了一下,才想明白,原来是并发数超过最大限制了,默认的并发数量是 5,这个绝对是不够的,并发超过限制是没有任何报错信息的,日志只会给出一个警告。

详细的解决方案如下:

If you encounter such an error in the php logs, then it is time to modify max_children. The php logs are usually located in /var/log/,  and in my case they are in /var/log/php7.4-fpm.log

Search for the file where the max_children variable is located, in my case the file is www.conf and is located in the folder: /etc/php/7.4/fpm/pool.d/

Change the value pm.max_children = 8 to a larger one, 16 for example

save the .conf file and restart the web server:

or only the php-fpm service as follows:

Eventually you can check these logs, who knows, you may not even know you have such a problem!

** As I noticed, for HestiaCP (VestaCP) users max_children can be found in both the /etc/php/7.4/fpm/pool.d/www.conf file and the file /usr/local/hestia/php/etc/php-fpm.conf

** Attention, you must also have enough memory for this, otherwise the results are not as expected!

Check the memory used by each php-fpm service-child with the following command:

Then, to see the memory required for these processes, we need to add the rss parameter which is “Resident Set Size” or the physical memory. Note: Modify php-fpm7.4 to suit your version of PHP:

These numbers are in Kbytes , so we calculate an average of the displayed values and multiply by max_children, and we find approximately the memory needed only for php, but don’t forget, the server also needs memory for Apache, Nginx, mysql … maybe Varnish, HAproxy, Redish, etc. .. so, check these values carefully!

参考链接


Solved! WARNING: [pool ***] server reached max_children, consider raising it

群晖DSM7通过Docker安装WordPress最新版

PHP 7.x连接MySQL 8.x报错“The server requested authentication method unknown to the client [caching_sha2_password]”

PHP 7.x使用如下代码连接MySQL 8.x

结果出现如下错误信息

原因为 MySQL 支持 caching_sha2_password  / 用户名密码 两种验证方式,但是从 MySQL 8 开始默认使用caching_sha2_password 的验证方式,导致以前版本的客户端不能成功连接。更详细的解释如下:

The server validates the user and returns the connection status. MySQL uses caching_sha2_password and auth_socket plugins for validation.

The caching_sha2_password plugin uses an SHA-2 algorithm with 256-bit password encryption. MySQL 8 prefers this auth method.

Whereas the auth_socket plugin checks if the socket username matches with the MySQL username. If the names don’t match, it checks for the socket username of the mysql.user. If a match is found, the plugin permits the connection.

But to serve the pre 8.0 clients and avoid compatibility errors, it is preferred to revert back the auth method. Older versions of MySQL use mysql_native_password plugin for validation.

解决方案为修改用户默认的认证方式,如下:

参考链接


[RESOLVED] MySQL the server requested authentication method unknown to the client

WordPress绑定多个域名,多个域名可同时独立访问

在未修改wp-config.php之前WordPress博客默认是不能实现多个域名独立访问的,即使我们绑定了多个域名,访问时也会自动跳转到安装站点时默认的域名,就连同一个域名带www和不带www都是自动跳转到默认域名。(这一点的不便之处深有体会,我找了几天才找到这个解决办法)

那如果我们需要WordPress绑定多个域名,并且都能度独立访问怎么办?

要想实现WordPress绑定多个域名,并且都能度独立访问也不难。我们只需修改wp-config.php文件即可,在站点根目录找到“wp-config.php”文件,然后根据自己需要添加下面任意一段代码即可。

一、实现任意域名访问

说明:在wp-config.php文件中加下面代码,就能实现绑定解析的域名都能正常访问博客,而且不会串联到其他域名。

二、限制特定域名访问

也可以只指定某些域名可以访问。注意把$domain = array('linqingmaoer.cn', 'www.linqingmaoer.cn');括号内的域名改成你自己需要绑定的域名。这样就可以设置成你添加的这几个域名能正常访问。而其他未添加的域名则无法访问。

2. 在完成上面的工作以后,你的网站已经可以实现多域名访问了,但是还是有一个问题,那就是静态资源,在wordpress上传的图片插入文章里面,地址是固定的,修改域名以后,并不会修改图片的域名,所以还需要修改静态文件地址,使用以下代码可以解决:

把这段代码加入上面的代码下面即可。

注意上述代码需要添加在

的前面。

注意,上述配置之后,可能会出现跨域相互访问问题,需要配置跨域访问属性,如下:
指定多个域名(http://client1.xxx.comhttp://client2.xxx.com等)跨域访问,则只需在server.php文件头部添加如下代码:

参考链接


WordPress 5.7.2多域名指向同一网站根据来源域名不同返回不同的网站标题

以前备案了多个独立网站,每次注册的时候,提交备案域名的网站标题都是不同的。现在多个网站同时指向了同一台服务器,现在就需要根据来源域名的不同,返回不同的网站标题信息,解决方法就是写自定义的拦截插件。

在主题functions.php中添加如上代码,用来自定义分隔符号和对已生成的title标题进行二次修改。

参考链接


关闭WordPress 5.7.2评论插件:Disable Comments

虽然可以在WP后台设置禁止评论,但对之前发表的文章无效,修改主题模板删除评论模块代码比较麻烦,通过安装 Disable Comments – Remove Comments & Protect From Spam禁用评论)插件,帮你一键关闭全站评论功能。

WordPress后台安装插件页面,直接搜索:Disable Comments 安装。

进入设置----Disable Comments,在设置页面,勾选第一个: Everywhere: Disable all comment-related controls and settings in WordPress.,点击“Save Changes”保存更改按钮即可。

继续阅读关闭WordPress 5.7.2评论插件:Disable Comments

解决WordPress 5.7.2某些插件报错“Uncaught TypeError: Cannot read property 'msie' of undefined”

升级到 WordPress 5.7.2 之后某些插件报错

导致无法运行,原因为

而新版本的 WordPress 5.7.2 使用的是 jQuery 3.5 因此上述异常就不足为奇了。

解决方法为在 WordPress 5.7.2 相关主题下,新增如下兼容脚本:

接着需要在主题的 footer.php 中增加引用,如下:

完整的 footer.php ,参考内容如下:

参考链接