七年前买车的时候买的电动充气洗车一体机,型号信息(Armorly A1-70W)。没有用几次,时间长了以后,水泵就就坏了,不出水。一直也没丢弃,这些天恰好翻出来,准备修理一下。
拆外壳是非常简单的,只需要拧下背部的八颗螺丝即可。拆水泵只需要拧下额外的四颗螺丝即可。
七年前买车的时候买的电动充气洗车一体机,型号信息(Armorly A1-70W)。没有用几次,时间长了以后,水泵就就坏了,不出水。一直也没丢弃,这些天恰好翻出来,准备修理一下。
拆外壳是非常简单的,只需要拧下背部的八颗螺丝即可。拆水泵只需要拧下额外的四颗螺丝即可。
本文主要以 POP3 为例讲解, 其他邮件协议可以参考思路, 自行尝试解决。
最近发生了一件比较尴尬的事, 公司邮箱密码忘记了, 又不想麻烦 IT 部门更改, 就想尝试下自己破解下本地的密码。 (密码已经以加密形式保存在本地电脑)
看到网上分享的一些办法, 如下:
第一种耗时耗力, 版本差异引起方法不通, 还需要破壳工具啥的自己去实际抓抓。
第二种不能用, 公司邮箱服务不允许明文连接, 加密数据不好破解。
所以我用了另一种方式, 下面直接分享步骤和代码, 后面再分享思路
|
1 |
127.0.0.1 <pop3邮件服务地址> |

启动 Python 写的服务程序, 代码如下:
|
1 2 3 4 5 6 7 8 9 10 11 12 13 14 15 16 17 18 19 20 21 22 23 24 25 26 27 28 29 30 31 32 33 34 35 36 37 |
import socket if __name__ == "__main__": s = socket.socket(socket.AF_INET, socket.SOCK_STREAM) s.bind(("127.0.0.1", 110)) s.listen(1) print("ready") while True: conn, addr = s.accept() print("connected by "+str(addr)) conn.send("+OK, POP3 server is ready.\r\n".encode("UTF-8")) while True: data = conn.recv(1024).decode("UTF-8") if(0 == data.find("QUIT")): conn.close() break else: if(0 == data.find("USER") or 0 == data.find("PASS")): print(data.strip()) conn.send("+OK\r\n".encode("UTF-8")) |
Foxmail 中点击 “收件” , Python 服务打印用户名密码:

本地的加密用户名就获取到了。
下面说下思路。其实思路也很简单, 就是模拟 POP3 协议, 写个假的 POP3 服务, 然后让 Foxmail 连接这个POP3 服务, 并把用户名和密码发送给我们的 POP3 服务。也是参考抓包提取密码的方法。只是没见过其他人分享过, 自己就分享了下, 其他邮件协议也可以参考下, 不需要把邮件协议完全模拟出来, 只要能够骗过 Foxmail 把用户名密码传过来认证就可以了。
下面大体说下 POP3 协议:
基于这个步骤, 我们就可以写个模拟 POP3 协议的服务, “骗取” Foxmail 的本地密码。
当然这种只适合用户忘记本地密码。
大家都知道 JS 中的 this 关键字通常出现在函数或者方法中,用来指向调用该函数或者方法的对象。但是在很多时候 this 的指向却并不总是如我们所愿,这一篇文章就一起来看看到底该如何判断 this 所指向的对象,同时在 this 指向丢失情况下如何恢复。
相信有过面向对象编程经验的朋友对于 this 的使用不会陌生,来看两个例子
|
1 2 3 4 5 6 7 8 9 10 11 12 |
function Student(name) { this.name = name; this.sayHello = function() { console.log(`Hello, my name is ${this.name}`) } } let zhangsan = new Student('zhangsan'); zhangsan.sayHello(); //Hello, my name is zhangsan |
这里的 this 指向的是构造函数生成的对象 zhangsan,对象调用自身的方法 sayHello(),其中的 this 自然不会有什么指向问题。
|
1 2 3 4 5 6 7 8 9 10 11 12 13 14 15 16 17 18 |
class People { constructor(name, age) { this.name = name; this.age = age; } sayHello() { console.log(`Hello, my name is ${this.name}, I am ${this.age} years old!`); } } let xiaofu = new People('xiaofu', 99); xiaofu.sayHello(); //Hello, my name is xiaofu, I am 99 years old! |
这里只是把构造函数换成了 class 语法的方式,this 指向的是类实例 xiaofu,实例调用自身的方法,其中的 this 也不会有什么指向问题。
但是再看下面这个例子
|
1 2 3 4 5 6 7 8 9 10 11 12 13 |
function Student(name) { this.name = name; this.sayHello = function() { console.log(`Hello, my name is ${this.name}`) } } let zhangsan = new Student('zhangsan'); // zhangsan.sayHello(); setTimeout(zhangsan.sayHello, 2000); //Hello, my name is |
注意 setTimeout 的第一个参数是一个函数名,而并不是具体的函数调用。
所以这里并不能直接传递 zhangsan.sayHello(),不然会马上执行。
本意是想等待 2 秒之后再打印,结果打印完发现 this.name 并没有打印出来,this 指向丢失了。按照 this 指向调用函数的对象的逻辑,说明 2 秒后调用 sayHello() 这个方法的已经不是 zhangsan 这个对象了。
如果在方法中打印一下 this,就会发现此时 this 指向的是 Window。也就是说最后一句可以像如下改写
|
1 2 3 |
let f = zhangsan.sayHello; setTimeout(f, 2000); |
执行异步操作的时候是将一个函数丢给浏览器,2 秒以后,浏览器去直接执行该函数。
这时候可以引出一个重要的结论:包含 this 的函数无法在定义的时候,而只有在被真正执行的时候才能知道this指向哪个对象。
再看下面的例子就很容易理解了
|
1 2 3 4 5 6 7 8 9 10 11 |
function runFunc(func) { this.name = 'lisi'; this.sayHello = func; } let lisi = new runFunc(zhangsan.sayHello); lisi.sayHello(); //Hello, my name is lisi |
因为 sayHello 这个方法真正执行的时候是被 lisi 这个对象调用,所以 this 指向的是 lisi 这个对象,this.name 打印了出来也是 lisi。
可能有朋友又要问了,那我直接执行 zhangsan.sayHello() 不也是相当于在 Window 中去执行这个函数吗?
让我们再看下面这个例子
|
1 2 3 4 5 6 7 8 9 10 11 12 13 14 15 16 |
function Student(name) { this.name = name; this.sayHello = function() { console.log(`Hello, my name is ${this.name}`) } this.info = { name:'Nobody', sayHello: function() { console.log(this.name) } } } let zhangsan = new Student('zhangsan'); zhangsan.info.sayHello(); //Nobody |
这里调用的 sayHello 函数是 info 对象下的,可以看到函数中的 this 指向的是 info 对象,而并不是 zhangsan 对象。这里又可以引出另外一个重要的结论:多重调用下,函数中的 this 只会指向函数的上一级对象。这里函数的上一级对象是 info,所以虽然 zhangsan 中也有一个 name,但是并不会被引用。
但是这里需要注意的是箭头函数。
箭头函数在 ES6 中被引入,写起来简洁明了,但是有一个特点需要注意,就是箭头函数没有独立的 this,其中的this 会自动从上一级继承。
所以如果改写下上面的代码
|
1 2 3 4 5 6 7 8 9 10 11 12 13 14 15 16 17 18 19 20 21 22 23 |
function Student(name) { this.name = name; this.sayHello = function() { console.log(`Hello, my name is ${this.name}`) // console.log(this); } this.info = { name:'Nobody', // sayHello:function() { console.log(this.name) } sayHello: () => { console.log(this.name) }, test:this.name } } let zhangsan = new Student('zhangsan'); zhangsan.info.sayHello(); //zhangsan console.log(zhangsan.info.test); //zhangsan |
可以看出,箭头函数中使用 this 就和直接在 info 中使用 this 效果一样,都是指向 zhangsan 对象。
再把话题回到 this 丢失上面来。
想要恢复 this 指向,根本逻辑就是想办法还是让 this 定义时候的对象来调用 this 所在的函数,回到上面的例子就是让 zhangsan 来调用 sayHello()。
有两种方式可以来实现,第一种是多添加一层函数调用
|
1 2 3 4 5 6 7 8 9 10 11 12 13 14 15 |
function Student(name) { this.name = name; this.sayHello = function() { console.log(`Hello, my name is ${this.name}`) } } let zhangsan = new Student('zhangsan'); // zhangsan.sayHello(); setTimeout( function() { zhangsan.sayHello(); }, 2000); //Hello, my name is zhangsan |
这里的最后一句相当于 Window.zhangsan.sayHello(),根据上面的规则,this 指向的是上一级对象,也就是zhangsan,所以可以成功打印出来。
并且这里使用箭头函数同样有效果,因为这里的函数只是起到多加一层包装的作用,并没有实际作用。
这里要特别说明一下特殊情况:
|
1 2 3 4 5 6 7 8 9 10 11 12 13 14 15 16 17 18 19 |
class Student { constructor(name) { this.name = name; } sayHello() { console.log(`Hello, my name is ${this.name}`); } delaySayHello() { setTimeout(() => { this.sayHello(); }, 2000); //Hello, my name is zhangsan } } let zhangsan = new Student("zhangsan"); zhangsan.delaySayHello(); |
这个情况不是很好理解,为什么箭头函数包装的 this 就可以传递过去?
其实,更方便理解的等价的写法如下:
|
1 2 3 4 5 6 7 8 9 10 11 12 13 14 15 16 17 18 19 20 |
class Student { constructor(name) { this.name = name; } sayHello() { console.log(`Hello, my name is ${this.name}`); } delaySayHello() { let keepThis = this; setTimeout(() => { keepThis.sayHello(); }, 2000); //Hello, my name is zhangsan } } let zhangsan = new Student("zhangsan"); zhangsan.delaySayHello(); |
注意如下函数:
|
1 2 3 4 |
delaySayHello() { let keepThis = this setTimeout(() => { keepThis.sayHello(); }, 2000); //Hello, my name is zhangsan } |
这样修改会更方便理解。其实本质上箭头函数本质上就是一个对象,这个对象保持了对外部对象的引用,因此不会出现 this 丢失的情况。
第二种方式是利用函数的 bind 方法,使用语法如下
|
1 |
let boundFunc = func.bind(context); |
这里就是将函数 func 绑定到了 context 这个上下文上,返回一个新的函数。不管被谁调用,这个新的函数里面的this 永远指向 context。
|
1 2 3 4 5 6 7 8 9 10 11 12 13 14 15 |
function Student(name) { this.name = name; this.sayHello = function() { console.log(`Hello, my name is ${this.name}`) } } let zhangsan = new Student('zhangsan'); // zhangsan.sayHello(); setTimeout(zhangsan.sayHello.bind(zhangsan), 2000); //Hello, my name is zhangsan |
这里就是将 sayHello() 这个方法绑定到了 zhangsan 这个对象上,以后不管这个返回的新函数被谁调用,都可以成功返回 zhangsan 中的 this.name。
但是这里要注意的是,只能绑定到构造函数返回的具体对象上,而不能直接绑定到类名 Student 上。
同时要注意 bind 并不支持级联操作
|
1 2 3 4 5 6 7 |
function f() { alert(this.name); } f = f.bind( {name: "John"} ).bind( {name: "Ann" } ); f(); //John |
这里首先将函数f绑定到一个对象,然后马上级联操作绑定到另一个对象,可以看出只有第一个 bind 起了效果。
同时这里也可以看到只有在函数执行的时候才会将 this 指向具体的对象
这里再提一个 bind 方法的进阶用法,就是固定函数传递的一部分参数值,有一点类似 python 中的 partial 函数。因为 bind 方法除了第一个参数是上下文,后面还可以接函数的默认参数值
|
1 2 3 4 5 6 7 8 9 10 11 12 13 |
function Student(name) { this.name = name; this.sayHello = function(age) { console.log(`Hello, my name is ${this.name}, I am ${age} years old.`) } } let zhangsan = new Student('zhangsan'); setTimeout(zhangsan.sayHello.bind(zhangsan, 99), 2000); |
这里修改了 sayHello() 方法,必须要传递一个参数,如果想以后每次执行该方法的时候都是传递参数 99 就可以像上面那样。
下面来一个更通用的例子。
有一个需要传递两个参数的函数如下
|
1 2 3 |
function intro(age, name) { console.log(`Hello, my name is ${name}, I am ${age} years old`); } |
通过 bind 方法将第一个参数值默认为 99,并返回一个新函数。这里因为没有 context 需要传递,所以第一个参数放 null,不能省略
|
1 2 3 |
intro99 = intro.bind(null, 99); intro99('xiaofu'); //Hello, my name is xiaofu, I am 99 years old |
注意这里只能是按照参数的先后顺序进行默认值传递,例如这里就不能跨过 age 给 name 传递默认值。
JS 中的 this 使用起来并不像其他 OOP 语言中的类似关键字方便(例如 python 中的 self),因为有指代丢失的问题出现,只能是在实际使用的时候多多练习,熟能生巧了。
一直使用 Crayon Syntax Highlighter (Crayon语法显示) 作为 WordPress 的代码高亮插件。但是这个插件已经长时间没有更新维护了,导致无法兼容最新版本的 Wordoress。
开发者 urvanov 进行维护的二次开发项目,在 Crayon Syntax highlighter 的基础上进行更新二次开发,解决了Crayon 在 WordPress 5.x 上出现的各种问题。
插件主页: Urvanov Syntax Highlighter,作者在原基础功能上进行了语法语言支持完善等优化,使用下来很赞。
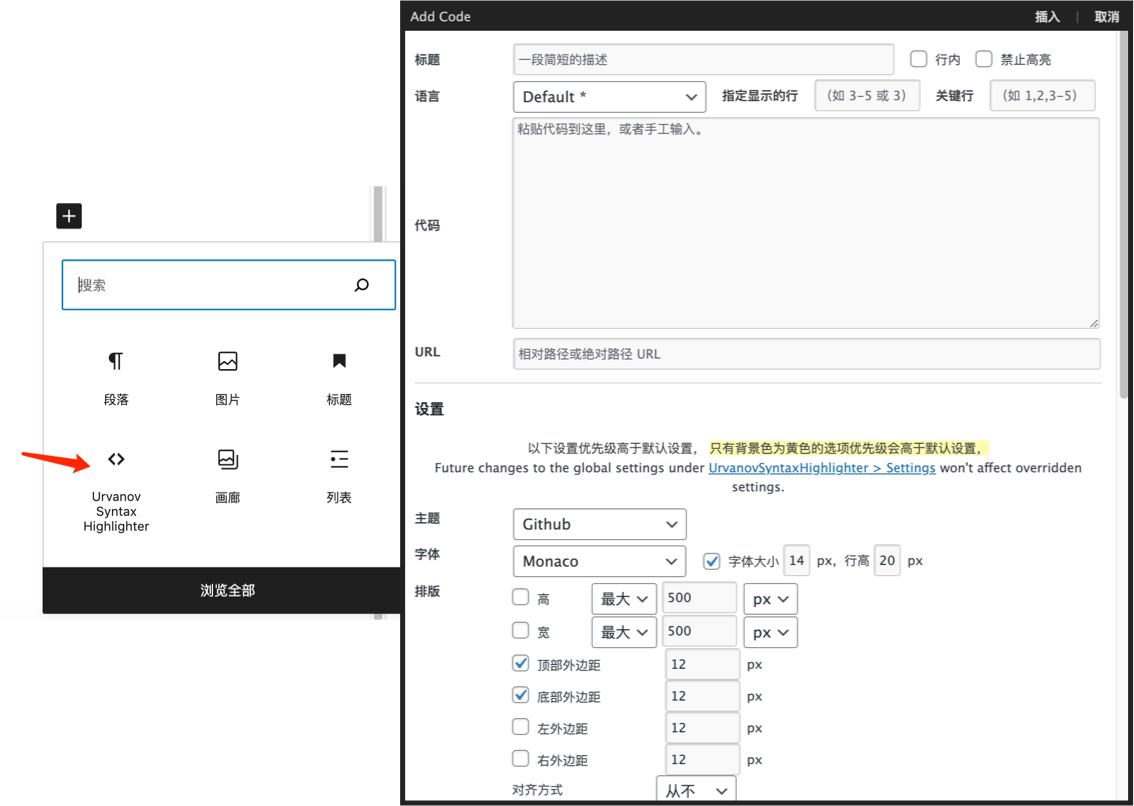
支持经典编辑器和新编辑器,代码块直接插入。使用体验与 Crayon Syntax highlighter相同。
最近,Flutter 升级到最新版本之后,iOS 真机调试的时候持续卡住在启动页面。
Xcode 输出如下报错信息:
|
1 |
Logging Error: Failed to initialize logging system. Log messages may be missing. If this issue persists, try setting IDEPreferLogStreaming=YES in the active scheme actions environment variables. |
Flutter 系统信息如下:
|
1 2 3 4 5 6 7 8 9 10 11 12 13 14 |
$ flutter doctor Doctor summary (to see all details, run flutter doctor -v): [✓] Flutter (Channel stable, 3.22.0, on macOS 14.5 23F79 darwin-arm64, locale zh-Hans-CN) [✓] Android toolchain - develop for Android devices (Android SDK version 34.0.0) [✓] Xcode - develop for iOS and macOS (Xcode 15.3) [✓] Chrome - develop for the web [✓] Android Studio (version 2023.3) [✓] IntelliJ IDEA Ultimate Edition (version 2018.3.6) [✓] IntelliJ IDEA Community Edition (version 2024.1) [✓] VS Code (version 1.89.0) [✓] Connected device (4 available) [✓] Network resources • No issues found! |
继续阅读Flutter调试 iOS 真机卡在启动页面,报错 “try setting IDEPreferLogStreaming=YES”
HarmonyOS NEXT 系统推荐使用 Lodash 库,更符合开发直觉。
|
1 |
ohpm install lodash |
Arrays are objects in JavaScript, so the triple equals operator === only returns true if the arrays are the same reference.
|
1 2 3 4 5 |
const a = [1, 2, 3]; const b = [1, 2, 3]; a === a; // true a === b; // false |
How do you compare whether two arrays are equal? Equality is a tricky subject: the JavaScript spec defines 4 different ways of checking if two values are "equal", and that doesn't take into account deep equality between objects.
In cases like this, it helps to be as explicit as possible about what you mean by "equal." In software engineering, asking a question in the right way often makes the answer obvious.
With that in mind, here's 3 definitions of equality for arrays and how to check them.
One approach for comparing a and b is checking if each value of a is strictly equal to the corresponding value of b. This works well if all the elements of the arrays are primitives as opposed to objects.
|
1 2 3 4 5 6 7 8 9 10 11 12 13 |
const a = [1, 2, 3]; const b = [4, 5, 6]; const c = [1, 2, 3]; function arrayEquals(a, b) { return Array.isArray(a) && Array.isArray(b) && a.length === b.length && a.every((val, index) => val === b[index]); } arrayEquals(a, b); // false arrayEquals(a, c); // true |
The previous arrayEquals() function works great for primitive values, but falls short if you want to compare objects by value.
|
1 2 3 4 5 |
const a = [{ answer: 42 }, { powerLevel: 9001 }]; const b = [{ answer: 42 }, { powerLevel: 9001 }]; // false, because { answer: 42 } !== { answer: 42 }, different references arrayEquals(a, b); |
One neat way to take into account object values is comparing arrays by their JSON.stringify() output.
|
1 2 3 4 5 6 |
const a = [{ answer: 42 }, { powerLevel: 9001 }]; const b = [{ answer: 42 }, { powerLevel: 9001 }]; const c = [{ answer: 42 }, { password: 'taco' }]; JSON.stringify(a) === JSON.stringify(b); // true JSON.stringify(a) === JSON.stringify(c); // false |
This approach is handy because it requires minimal code and no outside libraries. However, comparing JSON.stringify() output has an unfortunate edge case that may be a problem depending on your use case. Since undefined isn't a valid JSON value, the below arrays have the same JSON.stringify() output, because JSON.stringify() converts undefined to null.
|
1 2 |
const a = [undefined]; const b = [null]; |
isEqual()In addition to the null vs undefined quirk, comparing JSON.stringify() output also doesn't take into account object types. As far as JSON.stringify() is concerned, an object with a toJSON() function that returns 42 is the same as the number 42.
|
1 2 3 4 5 |
const a = [{ toJSON: () => 42 }]; const b = [42]; JSON.stringify(a); // '[42]' JSON.stringify(b); // '[42]' |
Similarly, a custom object is the same as a POJO:
|
1 2 3 4 5 6 7 8 9 10 |
class MyClass { constructor(obj) { Object.assign(this, obj); } } const a = [new MyClass({ answer: 42 })]; const b = [{ answer: 42 }]; JSON.stringify(a) === JSON.stringify(b); // true |
Lodash's isEqual() function, on the other hand, takes all this into account.
|
1 2 3 4 5 6 7 8 9 10 11 12 |
const _ = require('lodash'); class MyClass { constructor(obj) { Object.assign(this, obj); } } const a = [new MyClass({ answer: 42 })]; const b = [{ answer: 42 }]; _.isEqual(a, b); // false |
Lodash's isEqual() function is the way to go if you need all the bells and whistles of checking that objects have the same class. The JSON.stringify() approach works well for POJOs, just make sure you take into account null and only use it with trusted data - toJSON() can be a security vulnerability.
源代码编译 sqlite3 :
|
1 2 3 4 5 6 7 8 9 10 |
# https://github.com/clemensg/sqlite3pod $ wget https://www.sqlite.org/2024/sqlite-src-3450100.zip $ unzip sqlite-src-3450100.zip $ cd sqlite-src-3450100 $ ./configure $ make |
或者使用 pod 安装 sqlite3 报错:
|
1 2 3 4 5 6 7 8 9 10 11 12 13 14 15 16 17 18 19 20 21 22 23 24 25 26 27 28 29 30 31 32 33 34 35 36 37 38 39 40 41 42 43 44 45 46 47 48 49 50 51 52 53 54 55 56 57 58 59 60 61 62 63 64 65 66 67 68 69 70 71 72 73 74 75 76 77 78 79 80 81 82 83 84 85 86 87 88 89 90 91 92 93 94 95 96 97 98 99 100 101 102 103 104 105 106 107 108 109 110 111 112 113 114 115 116 117 118 119 120 121 122 123 124 125 126 127 128 129 130 131 132 133 134 135 136 137 138 139 140 141 142 143 144 145 146 147 148 149 150 151 152 153 154 155 156 157 |
$ pod try sqlite3 Updating spec repositories Trying sqlite3 [!] /opt/homebrew/bin/bash -c set -e cd sqlite-src-3450100 ./configure make sqlite3.c sqlite3.h sqlite3ext.h checking build system type... arm-apple-darwin23.4.0 checking host system type... arm-apple-darwin23.4.0 checking for gcc... gcc checking whether the C compiler works... yes checking for C compiler default output file name... a.out checking for suffix of executables... checking whether we are cross compiling... no checking for suffix of object files... o checking whether we are using the GNU C compiler... yes checking whether gcc accepts -g... yes checking for gcc option to accept ISO C89... none needed checking for a sed that does not truncate output... /opt/homebrew/bin/gsed checking for grep that handles long lines and -e... /opt/homebrew/bin/ggrep checking for egrep... /opt/homebrew/bin/ggrep -E checking for fgrep... /opt/homebrew/bin/ggrep -F checking for ld used by gcc... /Applications/Xcode.app/Contents/Developer/Toolchains/XcodeDefault.xctoolchain/usr/bin/ld checking if the linker (/Applications/Xcode.app/Contents/Developer/Toolchains/XcodeDefault.xctoolchain/usr/bin/ld) is GNU ld... no checking for BSD- or MS-compatible name lister (nm)... /usr/bin/nm -B checking the name lister (/usr/bin/nm -B) interface... BSD nm checking whether ln -s works... yes checking the maximum length of command line arguments... 786432 checking whether the shell understands some XSI constructs... yes checking whether the shell understands "+="... yes checking for /Applications/Xcode.app/Contents/Developer/Toolchains/XcodeDefault.xctoolchain/usr/bin/ld option to reload object files... -r checking for objdump... objdump checking how to recognize dependent libraries... pass_all checking for ar... ar checking for strip... strip checking for ranlib... ranlib checking command to parse /usr/bin/nm -B output from gcc object... ok checking for dsymutil... dsymutil checking for nmedit... nmedit checking for lipo... lipo checking for otool... otool checking for otool64... no checking for -single_module linker flag... no checking for -exported_symbols_list linker flag... yes checking how to run the C preprocessor... gcc -E checking for ANSI C header files... yes checking for sys/types.h... yes checking for sys/stat.h... yes checking for stdlib.h... yes checking for string.h... yes checking for memory.h... yes checking for strings.h... yes checking for inttypes.h... yes checking for stdint.h... yes checking for unistd.h... yes checking for dlfcn.h... yes checking for objdir... .libs checking if gcc supports -fno-rtti -fno-exceptions... yes checking for gcc option to produce PIC... -fno-common -DPIC checking if gcc PIC flag -fno-common -DPIC works... yes checking if gcc static flag -static works... no checking if gcc supports -c -o file.o... yes checking if gcc supports -c -o file.o... (cached) yes checking whether the gcc linker (/Applications/Xcode.app/Contents/Developer/Toolchains/XcodeDefault.xctoolchain/usr/bin/ld) supports shared libraries... yes checking dynamic linker characteristics... darwin23.4.0 dyld checking how to hardcode library paths into programs... immediate checking whether stripping libraries is possible... yes checking if libtool supports shared libraries... yes checking whether to build shared libraries... yes checking whether to build static libraries... yes checking for a BSD-compatible install... /opt/homebrew/bin/ginstall -c checking for special C compiler options needed for large files... no checking for _FILE_OFFSET_BITS value needed for large files... no checking for int8_t... yes checking for int16_t... yes checking for int32_t... yes checking for int64_t... yes checking for intptr_t... yes checking for uint8_t... yes checking for uint16_t... yes checking for uint32_t... yes checking for uint64_t... yes checking for uintptr_t... yes checking for sys/types.h... (cached) yes checking for stdlib.h... (cached) yes checking for stdint.h... (cached) yes checking for inttypes.h... (cached) yes checking malloc.h usability... no checking malloc.h presence... no checking for malloc.h... no checking for fdatasync... yes checking for gmtime_r... yes checking for isnan... yes checking for localtime_r... yes checking for localtime_s... no checking for malloc_usable_size... no checking for strchrnul... no checking for usleep... yes checking for utime... yes checking for pread... yes checking for pread64... no checking for pwrite... yes checking for pwrite64... no checking for tclsh8.7... no checking for tclsh8.6... tclsh8.6 configure: Version set to 3.45 configure: Release set to 3.45.1 checking for WASI SDK directory... no checking whether to support threadsafe operation... yes checking for library containing pthread_create... none required checking for library containing pthread_mutexattr_init... none required checking whether to support shared library linked as release mode or not... no checking whether to use an in-ram database for temporary tables... no checking if executables have the .exe suffix... unknown checking for Tcl configuration... found /opt/homebrew/Cellar/tcl-tk/8.6.14/lib/tclConfig.sh checking for existence of /opt/homebrew/Cellar/tcl-tk/8.6.14/lib/tclConfig.sh... loading checking for library containing readline... -ledit not using linenoise checking for library containing fdatasync... none required checking build type... release checking zlib.h usability... yes checking zlib.h presence... yes checking for zlib.h... yes checking for library containing deflate... -lz checking for library containing dlopen... none required checking whether to support math functions... yes checking for library containing ceil... none required checking whether to support JSON functions... yes checking whether to support MEMSYS5... no checking whether to support MEMSYS3... no checking whether to support FTS3... no checking whether to support FTS4... no checking whether to support FTS5... no checking whether to support LIMIT on UPDATE and DELETE statements... no checking whether to support GEOPOLY... no checking whether to support RTREE... no checking whether to support SESSION... no configure: creating ./config.status config.status: creating Makefile config.status: creating sqlite3.pc config.status: creating sqlite_cfg.h config.status: sqlite_cfg.h is unchanged config.status: executing libtool commands gcc -g -O2 -o mkkeywordhash -DSQLITE_ENABLE_MATH_FUNCTIONS /private/var/folders/z8/_cvsdvbd4x51vm4szw5xkw0w0000gn/T/CocoaPods/Try/sqlite3/sqlite-src-3450100/tool/mkkeywordhash.c ./mkkeywordhash >keywordhash.h gcc -g -O2 -o lemon /private/var/folders/z8/_cvsdvbd4x51vm4szw5xkw0w0000gn/T/CocoaPods/Try/sqlite3/sqlite-src-3450100/tool/lemon.c cp /private/var/folders/z8/_cvsdvbd4x51vm4szw5xkw0w0000gn/T/CocoaPods/Try/sqlite3/sqlite-src-3450100/tool/lempar.c . cp /private/var/folders/z8/_cvsdvbd4x51vm4szw5xkw0w0000gn/T/CocoaPods/Try/sqlite3/sqlite-src-3450100/src/parse.y . ./lemon -DSQLITE_ENABLE_MATH_FUNCTIONS -S parse.y sh /private/var/folders/z8/_cvsdvbd4x51vm4szw5xkw0w0000gn/T/CocoaPods/Try/sqlite3/sqlite-src-3450100/tool/cktclsh.sh 8.4 tclsh8.6 touch has_tclsh84 cat parse.h /private/var/folders/z8/_cvsdvbd4x51vm4szw5xkw0w0000gn/T/CocoaPods/Try/sqlite3/sqlite-src-3450100/src/vdbe.c | tclsh8.6 /private/var/folders/z8/_cvsdvbd4x51vm4szw5xkw0w0000gn/T/CocoaPods/Try/sqlite3/sqlite-src-3450100/tool/mkopcodeh.tcl >opcodes.h tclsh8.6 /private/var/folders/z8/_cvsdvbd4x51vm4szw5xkw0w0000gn/T/CocoaPods/Try/sqlite3/sqlite-src-3450100/tool/mkopcodec.tcl opcodes.h >opcodes.c make: *** No rule to make target `sqlite_cfg.h', needed by `.target_source'. Stop. |
观察源代码目录,也确实没有 sqlite_cfg.h 文件生成。
继续阅读make: *** No rule to make target `sqlite_cfg.h', needed by `.target_source'
使用 flutter、Android Studio ,通过iOS模拟器运行项目,一直一切正常。
某次重启后无法启动模拟器,报错信息如下:
|
1 |
"Unable to boot the simulator". |
解决方法,亲测有效:
macOS 14.4.1以及更高版本:
进入 “系统设置”→“通用”→“存储空间”→“开发者” 删除 “XCode 缓存” 。
在 macOS 13 及更高版本上:
进入 “系统设置”→“常规”→“存储”→“开发人员”
删除“开发者缓存”
在 macOS 12 及更低版本上:
转到“关于本机”→“存储”→“管理”→“开发人员”
1、前言
JFrog Artifactory 是目前全球唯一的支持所有开发语言,功能最强大的二进制制品仓库。
2、系统平台
操作系统 : Ubuntu 22.04.4 LTS (GNU/Linux 6.5.0-26-generic x86_64)
3、安装依赖&拉取镜像
使用 OSS 社区版本,官方有详细说明介绍。
完整的执行指令如下图所示
|
1 2 3 4 5 6 7 8 9 10 11 12 13 14 15 16 17 18 19 20 21 22 23 24 25 26 |
# 安装 podman $ sudo apt install podman # 创建一个低权限用户,尽量不要使用root用户,身份操作podman,降低安全风险 $ sudo adduser podman # 允许用户下的容器在系统启动的时候启动服务 $ sudo loginctl enable-linger podman $ export JFROG_HOME=/home/podman/.dockers/jfrogoss # 准备本地目录映射 $ sudo mkdir -p $JFROG_HOME/var/etc/ $ cd $JFROG_HOME/var/etc/ $ sudo touch ./system.yaml $ sudo chown -R podman $JFROG_HOME $ sudo chown -R 1030:1030 $JFROG_HOME/var $ sudo chmod -R 777 $JFROG_HOME/var # 手工拉去部分镜像,或者可以在 /etc/containers/registries.conf 配置下载服务器,可省略前面的服务器 releases-docker.jfrog.io $ podman pull releases-docker.jfrog.io/jfrog/artifactory-oss |
执行上面的指令后,可以看到 releases-docker.jfrog.io/jfrog/artifactory-oss 镜像下载进度。
4、启动配置
首先要创建本地的数据目录,然后启动的时候挂载本地创建的数据目录即可。
执行启动指令:
|
1 2 3 4 5 6 7 8 9 10 11 12 |
# 为 Docker 容器分配内存资源。可以使用 --memory 参数设置容器可以使用的内存量,使用 --memory-swap 参数限制交换空间的大小 $ podman run --name jfrogoss --cpus=2 --memory=2g --memory-swap=4g -d -v /home/podman/.dockers/jfrogoss/var:/var/opt/jfrog/artifactory -p 18081:8081 -p 18082:8082 releases-docker.jfrog.io/jfrog/artifactory-oss # 查看该容器 $ podman ps # 如果需要进入容器查看执行情况,参考如下命令 # podman exec -it jfrogoss bash # 每次都启动新容器方式创建servcie //--new参数,每次启动都删除旧容器,启动一个新容器 $ podman generate systemd --restart-policy=always -n --new -f jfrogoss |
查看进程及IP跟端口号,启动一切正常了,打开浏览器访问系统看看效果。
查看启动文件:
|
1 |
$ cat container-jfrogoss.service |
内容如下:
|
1 2 3 4 5 6 7 8 9 10 11 12 13 14 15 16 17 18 19 20 21 22 23 24 |
# container-jfrogoss.service # autogenerated by Podman 3.4.4 # Sat Mar 30 19:04:05 CST 2024 [Unit] Description=Podman container-jfrogoss.service Documentation=man:podman-generate-systemd(1) Wants=network-online.target After=network-online.target RequiresMountsFor=%t/containers [Service] Environment=PODMAN_SYSTEMD_UNIT=%n Restart=always TimeoutStopSec=70 ExecStartPre=/bin/rm -f %t/%n.ctr-id ExecStart=/usr/bin/podman run --cidfile=%t/%n.ctr-id --cgroups=no-conmon --rm --sdnotify=conmon --replace --name jfrogoss --cpus=2 --memory=2g --memory-swap=4g -d -v /home/podman/.dockers/jfrogoss/var:/var/opt/jfrog/artifactory -p 18081:8081 -p 18082:8082 releases-docker.jfrog.io/jfrog/artifactory-oss ExecStop=/usr/bin/podman stop --ignore --cidfile=%t/%n.ctr-id ExecStopPost=/usr/bin/podman rm -f --ignore --cidfile=%t/%n.ctr-id Type=notify NotifyAccess=all [Install] WantedBy=default.target |
需要额外注意的一个地方是,给出的路径必须是完整路径 “/home/podman/.dockers/jfrogoss”,不能是 “~/.dockers/jfrogoss”,Systemd不能正确展开 “~” ,导致路径找不到,从而在启动的时候失败,报告错误代码 125 。
Systemd 配置,开机/重启自动启动服务:
|
1 2 3 4 5 6 7 8 9 10 11 12 13 14 15 16 17 18 19 20 21 22 23 24 25 26 27 28 29 30 31 32 33 34 |
# 切换到刚刚创建的低权限用户 ,注意,必须使用 su - user 的方式切换 # 如果使用 su user 切换会导致环境变量被带到新用户,导致执行报错 # ERRO[0000] XDG_RUNTIME_DIR directory "/run/user/1000" is not owned by the current user $ su - podman # 保存到 ~/.config/systemd/user/ $ mkdir .config $ mkdir .config/systemd $ mkdir .config/systemd/user $ mv container-jfrogoss.service ~/.config/systemd/user/ # 以当前用户身份刷新配置文件,让其生效 $ systemctl --user daemon-reload # 设置容器开机自启,并且现在启动 $ systemctl --user enable --now ~/.config/systemd/user/container-jfrogoss.service # 如果需要进入容器查看执行情况,参考如下命令 # podman exec -it jfrogoss bash # 测试,重启系统,观察是否能开机自动启动 $ sudo reboot # 启动或重启服务 # systemctl --user start container-jfrogoss.service # systemctl --user restart container-jfrogoss.service # 如果启动失败,观察服务日志 # sudo journalctl -f |
5、访问、登录
Access Artifactory from your browser at:
http://SERVER_HOSTNAME:18082/ui/
For example, on your local machine:
http://localhost:18082/ui/
默认用户名:admin, 密码: password。
启用匿名访问:

Maven服务器配置
客户端配置 http://SERVER_HOSTNAME:18082/artifactory/maven-remote/
用户切换改变网络的过程中,应用概率会出现崩溃,日志如下
|
1 2 3 4 5 6 7 8 9 10 11 12 13 14 15 16 17 18 19 20 21 22 23 24 25 26 27 28 29 30 31 32 33 34 35 36 37 38 39 40 41 42 43 44 45 46 47 48 49 50 51 52 53 54 55 56 57 58 59 60 61 62 63 64 65 66 67 68 69 70 71 72 |
API level: '30' OS version: '11' ABI list: 'arm64-v8a,armeabi-v7a,armeabi' Manufacturer: 'OnePlus' Brand: 'OnePlus' Model: 'GM1900' Build fingerprint: 'OnePlus/OnePlus7_CH/OnePlus7:11/RKQ1.201022.002/2108161921:user/release-keys' pid: 29126, tid: 29126, name: main >>> package name <<< java stacktrace: java.lang.SecurityException: getDataNetworkTypeForSubscriber at android.os.Parcel.createExceptionOrNull(Parcel.java:2373) at android.os.Parcel.createException(Parcel.java:2357) at android.os.Parcel.readException(Parcel.java:2340) at android.os.Parcel.readException(Parcel.java:2282) at com.android.internal.telephony.ITelephony$Stub$Proxy.getNetworkTypeForSubscriber(ITelephony.java:8803) at android.telephony.TelephonyManager.getNetworkType(TelephonyManager.java:3070) at android.telephony.TelephonyManager.getNetworkType(TelephonyManager.java:3034) at j.k.b0.a.e.b.c(Unknown Source:51) at j.k.b.q.c.w.onCreateView(:14) at androidx.fragment.app.Fragment.performCreateView(Unknown Source:15) at h.l.d.q.V(:18) at h.l.d.q.T(:1) at h.l.d.q.U(Unknown Source:47) at h.l.d.a.n(Unknown Source:182) at h.l.d.q.E(:7) at h.l.d.q.b0(Unknown Source:84) at h.l.d.q.D(Unknown Source:31) at h.l.d.a.e(:2) at h.l.d.v.finishUpdate(Unknown Source:12) at androidx.viewpager.widget.ViewPager.r(:2) at androidx.viewpager.widget.ViewPager.onMeasure(:1) at android.view.View.measure(View.java:25671) at androidx.constraintlayout.widget.ConstraintLayout.e(:2) at androidx.constraintlayout.widget.ConstraintLayout.onMeasure(:70) at android.view.View.measure(View.java:25671) at android.view.ViewGroup.measureChildWithMargins(ViewGroup.java:6987) at android.widget.FrameLayout.onMeasure(FrameLayout.java:194) at androidx.appcompat.widget.ContentFrameLayout.onMeasure(Unknown Source:154) at android.view.View.measure(View.java:25671) at android.view.ViewGroup.measureChildWithMargins(ViewGroup.java:6987) at android.widget.LinearLayout.measureChildBeforeLayout(LinearLayout.java:1552) at android.widget.LinearLayout.measureVertical(LinearLayout.java:842) at android.widget.LinearLayout.onMeasure(LinearLayout.java:721) at android.view.View.measure(View.java:25671) at android.view.ViewGroup.measureChildWithMargins(ViewGroup.java:6987) at android.widget.FrameLayout.onMeasure(FrameLayout.java:194) at android.view.View.measure(View.java:25671) at android.view.ViewGroup.measureChildWithMargins(ViewGroup.java:6987) at android.widget.LinearLayout.measureChildBeforeLayout(LinearLayout.java:1552) at android.widget.LinearLayout.measureVertical(LinearLayout.java:842) at android.widget.LinearLayout.onMeasure(LinearLayout.java:721) at android.view.View.measure(View.java:25671) at android.view.ViewGroup.measureChildWithMargins(ViewGroup.java:6987) at android.widget.FrameLayout.onMeasure(FrameLayout.java:194) at com.android.internal.policy.DecorView.onMeasure(DecorView.java:776) at android.view.View.measure(View.java:25671) at android.view.ViewRootImpl.performMeasure(ViewRootImpl.java:3713) at android.view.ViewRootImpl.measureHierarchy(ViewRootImpl.java:2496) at android.view.ViewRootImpl.performTraversals(ViewRootImpl.java:2771) at android.view.ViewRootImpl.doTraversal(ViewRootImpl.java:2182) at android.view.ViewRootImpl$TraversalRunnable.run(ViewRootImpl.java:8730) at android.view.Choreographer$CallbackRecord.run(Choreographer.java:1352) at android.view.Choreographer.doCallbacks(Choreographer.java:1149) at android.view.Choreographer.doFrame(Choreographer.java:1049) at android.view.Choreographer$FrameHandler.handleMessage(Choreographer.java:1275) at android.os.Handler.dispatchMessage(Handler.java:106) at android.os.Looper.loop(Looper.java:233) at android.app.ActivityThread.main(ActivityThread.java:8010) at java.lang.reflect.Method.invoke(Native Method) at com.android.internal.os.RuntimeInit$MethodAndArgsCaller.run(RuntimeInit.java:631) at com.android.internal.os.ZygoteInit.main(ZygoteInit.java:978) |
另外一种场景就是集成了华为的二维码扫描 com.huawei.hms:scanplus:1.3.2.300 ,这个 SDK 比较奇葩的地方在于,使用 Wi-Fi 网络情况下是不会出现问题的。
但是在手机流量的情况下,不申请 android.permission.READ_PHONE_STATE 权限,初始化这个 SDK 会导致应用闪退。
崩溃堆栈如下:
|
1 2 3 4 5 6 7 8 9 10 11 12 13 14 15 16 |
java.lang.SecurityException: getNetworkTypeForSubscriber at android.os.Parcel.createExceptionOrNull(Parcel.java:2437) at android.os.Parcel.createException(Parcel.java:2421) at android.os.Parcel.readException(Parcel.java:2404) at android.os.Parcel.readException(Parcel.java:2346) at com.android.internal.telephony.ITelephony$Stub$Proxy.getNetworkTypeForSubscriber(ITelephony.java:9325) at android.telephony.TelephonyManager.getNetworkType(TelephonyManager.java:3002) at android.telephony.TelephonyManager.getNetworkType(TelephonyManager.java:2964) at com.huawei.hms.mlkit.common.ha.d.b(HianalyticsLogUtils.java:68) at com.huawei.hms.mlkit.common.ha.HianalyticsLogProvider.logEnd(HianalyticsLogProvider.java:6315) at com.huawei.hms.ml.camera.g$a.a(HiAnalyticsThread.java:109) at com.huawei.hms.ml.camera.g$a.handleMessage(HiAnalyticsThread.java:78) at android.os.Handler.dispatchMessage(Handler.java:114) at android.os.Looper.loopOnce(Looper.java:206) at android.os.Looper.loop(Looper.java:296) at com.huawei.hms.ml.camera.g.run(HiAnalyticsThread.java:51) |
根据 SecurityException: getDataNetworkTypeForSubscriber 可以看到,这是一个安全性异常,所以猜测应用在 Android11 的权限有关,由于缺少该权限导致无法访问接口而异常。
找到网络状态检测方法,可以看到调用了 TelephonyManager.getNetworkType()接口获取网络类型,该方法是需要 READ_PHONE_STATE 权限的,该方法上面也有 RequiresPermission 注解声明
|
1 2 3 4 5 6 7 8 9 10 11 12 13 14 15 16 17 18 19 20 21 22 23 24 25 |
@RequiresPermission(value = "android.permission.READ_PHONE_STATE") public int getNetworkState(Context context) { if (null == mConnectivityManager) { // 为空则认为无网络 return NETWORK_NONE; } // 获取网络类型,如果为空,返回无网络 NetworkInfo activeNetInfo = mConnectivityManager.getActiveNetworkInfo(); if (activeNetInfo == null || !activeNetInfo.isAvailable()) { return NETWORK_NONE; } // 判断是否为WIFI NetworkInfo wifiInfo = mConnectivityManager.getNetworkInfo(ConnectivityManager.TYPE_WIFI); if (null != wifiInfo) { NetworkInfo.State state = wifiInfo.getState(); if (null != state) { if (state == NetworkInfo.State.CONNECTED || state == NetworkInfo.State.CONNECTING) { return NETWORK_WIFI; } } } // 若不是WIFI,则去判断是2G、3G、4G网 TelephonyManager telephonyManager = (TelephonyManager) context.getSystemService(Context.TELEPHONY_SERVICE); int networkType = telephonyManager.getNetworkType(); ... } |
进一步分析,接口的调用堆栈为:
|
1 2 3 4 5 6 7 8 9 10 |
TelephonyManager.getNetworkType ->PhoneInterfaceManager.getNetworkTypeForSubscriber->TelephonyPermissions.checkCallingOrSelfReadPhoneState->TelephonyPermissions.checkReadPhoneState->ContextImpl.enforcePermission->ContextImpl.checkPermission->PermissionManager.checkPermission->PermissionTelephonyManager.getNetworkType -> PhoneInterfaceManager.getNetworkTypeForSubscriber-> TelephonyPermissions.checkCallingOrSelfReadPhoneState-> TelephonyPermissions.checkReadPhoneState-> ContextImpl.enforcePermission-> ContextImpl.checkPermission-> PermissionManager.checkPermission-> PermissionManager.checkPermissionUncached-> ActivityManager.getService-> IActivityManager.checkPermission-> |
|
1 2 3 4 5 6 7 8 9 10 11 12 13 14 15 16 17 18 19 20 21 22 23 24 25 26 27 28 29 30 |
private void requestPermission() { LogUtil.printE(HomeActivity.class, ">>> etrunc requestPermission SDK-VERSION= " + Build.VERSION.SDK_INT); if (Build.VERSION.SDK_INT >= Build.VERSION_CODES.R) { //Android 11 授权读写权限 XXPermissions.with(HomeActivity.this) // 不适配 Android 11 可以这样写 //.permission(Permission.Group.STORAGE) // 适配 Android 11 需要这样写,这里无需再写 Permission.Group.STORAGE .permission(Permission.MANAGE_EXTERNAL_STORAGE, Permission.READ_PHONE_STATE) .request(new OnPermissionCallback() { @Override public void onGranted(List<String> permissions, boolean all) { if (all) { ToastUtil.showToast(getApplication(), R.string.permission_success_tip); } } @Override public void onDenied(List<String> permissions, boolean never) { if (never) { ToastUtil.showToast(getApplication(), R.string.permissions_refuse_authorization); // 如果是被永久拒绝就跳转到应用权限系统设置页面 XXPermissions.startPermissionActivity(HomeActivity.this, permissions); } else { ToastUtil.showToast(getApplication(), R.string.permissions_error); } } }); } } |