本教程小编和大家分享 Windows 7 系统电脑安装RNDIS驱动的正确方法,RNDIS驱动是什么? Windows 7 系统驱动RNDIS是远端网络驱动接口协议,设备通过USB方式同主机连接,模拟网络连接以便用于下载和调试工作。但是很多 Windows 7 系统用户安装RNDIS的设备时失败,遇到无法安装的问题,所以小编给大家介绍 Windows 7 系统电脑安装RNDIS驱动的正确方法。
具体方法如下:
1、设备连接计算机后,操作系统会自动搜索并安装RNDIS驱动,片刻之后就会出现安装失败的问题;
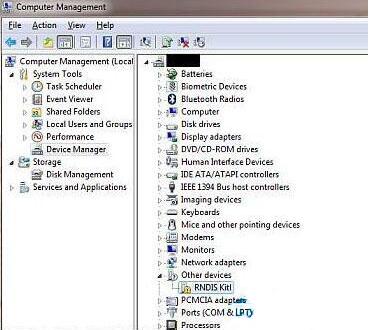
2、在“计算机”图标上右键,选择“管理”——“设备管理”,可看到“RNDIS Kitl”设备,并且处于驱动未安装状态;
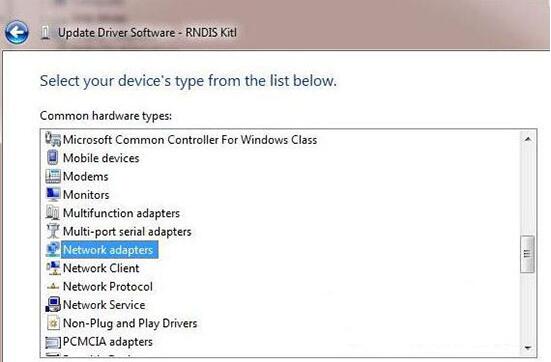
3、在该设备上右键选择更新驱动软件,搜索设备软件提示窗口,选择“浏览我的计算机”。选择从设备列表中选择“网络适配器”;

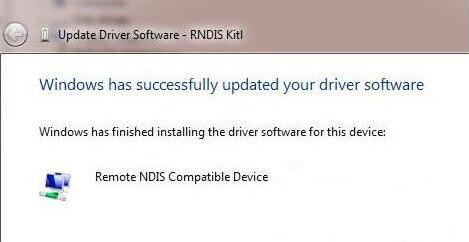
4、在网络适配器窗口的制造商列表中选择Microsoft Corporation,然后右侧列表中选择“Remote NDIS Compatible Device”即远端NDIS兼容设备。
5、点击下一步并等待安装结束,RNDIS Kitl设备将会安装成功。
上述教程内容就是 Windows 7 系统电脑安装RNDIS驱动的正确方法,有需要安装RNDIS驱动的小伙伴们,可采取上述教程进行安装,希望可以帮助到大家。


Thanks for the detailed information on the latest trends in mobile technology! The breakdown of features and advancements is both informative and engaging, offering a clear picture of where the industry is heading. I particularly appreciate the focus on user-centric design and how these innovations aim to improve everyday experiences. Your insights into emerging technologies and their potential applications are thought-provoking and inspiring. This article is a great read for anyone interested in staying ahead in the fast-evolving world of mobile tech!