word2vec是Google于2013年开源推出的一个用于获取词向量的工具包,关于它的介绍,可以先看词向量工具word2vec的学习。
获取和处理中文语料
维基百科的中文语料库质量高、领域广泛而且开放,非常适合作为语料用来训练。相关链接:
- https://dumps.wikimedia.org/
- https://dumps.wikimedia.org/zhwiki/
- https://dumps.wikimedia.org/zhwiki/latest/zhwiki-latest-pages-articles.xml.bz2
有了语料后我们需要将其提取出来,因为wiki百科中的数据是以XML格式组织起来的,所以我们需要寻求些方法。查询之后发现有两种主要的方式:gensim的wikicorpus库,以及wikipedia Extractor。
WikiExtractor
Wikipedia Extractor是一个用Python写的维基百科抽取器,使用非常方便。下载之后直接使用这条命令即可完成抽取,运行时间很快。执行以下命令。
相关链接:
相关命令:
|
1 2 3 |
$ git clone https://github.com/attardi/wikiextractor.git $ python ./wikiextractor/WikiExtractor.py -b 2048M -o extracted zhwiki-latest-pages-articles.xml.bz2 |
相关说明:
- -b 2048M表示的是以128M为单位进行切分,默认是1M。
- extracted:需要将提取的文件存放的路径;
- zhwiki-latest-pages-articles.xml.bz2:需要进行提取的.bz2文件的路径
二次处理:
通过Wikipedia Extractor处理时会将一些特殊标记的内容去除了,但有时这些并不影响我们的使用场景,所以只要把抽取出来的标签和一些空括号、「」、『』、空书名号等去除掉即可。
|
1 2 3 4 5 6 7 8 9 10 11 12 13 14 15 16 17 18 19 20 21 22 23 24 25 26 27 28 29 30 31 32 33 34 35 36 |
import re import sys import codecs def filte(input_file): p1 = re.compile('[(\(][,;。?!\s]*[)\)]') p2 = re.compile('《》') p3 = re.compile('「') p4 = re.compile('」') p5 = re.compile('<doc (.*)>') p6 = re.compile('</doc>') p7 = re.compile('『』') p8 = re.compile('『') p9 = re.compile('』') p10 = re.compile('-\{.*?(zh-hans|zh-cn):([^;]*?)(;.*?)?\}-') outfile = codecs.open('std_' + input_file, 'w', 'utf-8') with codecs.open(input_file, 'r', 'utf-8') as myfile: for line in myfile: line = p1.sub('', line) line = p2.sub('', line) line = p3.sub('“', line) line = p4.sub('”', line) line = p5.sub('', line) line = p6.sub('', line) line = p7.sub('', line) line = p8.sub('“', line) line = p9.sub('”', line) line = p10.sub('', line) outfile.write(line) outfile.close() if __name__ == '__main__': input_file = sys.argv[1] filte(input_file) |
保存后执行 python filte.py wiki_00 即可进行二次处理。
gensim的wikicorpus库
转化程序:
|
1 2 3 4 5 6 7 8 9 10 11 12 13 14 15 16 17 18 19 20 21 22 23 24 25 26 |
# -*- coding: utf-8 -*- from gensim.corpora import WikiCorpus import os class Config: data_path = '/home/qw/CodeHub/Word2Vec/zhwiki' zhwiki_bz2 = 'zhwiki-latest-pages-articles.xml.bz2' zhwiki_raw = 'zhwiki_raw.txt' def data_process(_config): i = 0 output = open(os.path.join(_config.data_path, _config.zhwiki_raw), 'w') wiki = WikiCorpus(os.path.join(_config.data_path, _config.zhwiki_bz2), lemmatize=False, dictionary={}) for text in wiki.get_texts(): output.write(' '.join(text) + '\n') i += 1 if i % 10000 == 0: print('Saved ' + str(i) + ' articles') output.close() print('Finished Saved ' + str(i) + ' articles') config = Config() data_process(config) |
化繁为简
维基百科的中文数据是繁简混杂的,里面包含大陆简体、台湾繁体、港澳繁体等多种不同的数据。有时候在一篇文章的不同段落间也会使用不同的繁简字。这里使用opencc来进行转换。
|
1 |
$ opencc -i zhwiki_raw.txt -o zhswiki_raw.txt -c t2s.json |
中文分词
这里直接使用jieba分词的命令行进行处理:
|
1 |
$ python -m jieba -d " " ./zhswiki_raw.txt >./zhswiki_cut.txt |
转换成 utf-8 格式
非 UTF-8 字符会被删除
|
1 |
$ iconv -c -t UTF-8 -o zhwiki.utf8.txt zhwiki.zhs.txt |
参考链接:https://github.com/lzhenboy/word2vec-Chinese
word2vec模型训练
C语言版本word2vec
项目地址:
安装:
|
1 2 3 4 5 |
$ git clone https://github.com/tmikolov/word2vec.git $ cd word2vec $ make |
训练词向量
|
1 |
$ ./word2vec -train "input.txt" -output "output.model" -cbow 1 -size 128 -window 8 -negative 25 -hs 0 -sample 1e-4 -threads 8 -binary 1 -iter 15 |
- -train “input.txt” 表示在指定的语料库上训练模型
- -output 结果输入文件,即每个词的向量
- -cbow 是否使用cbow模型,0表示使用skip-gram模型,1表示使用cbow模型,默认情况下是skip-gram模型,cbow模型快一些,skip-gram模型效果好一些
- -size 表示输出的词向量维数
- -window 8 训练窗口的大小为8 即考虑一个单词的前八个和后八个单词(实际代码中还有一个随机选窗口的过程,窗口大小<=5)
- -negative 表示是否使用NEG方,0表示不使用,其它的值目前还不是很清楚
- -hs 是否使用HS方法,0表示不使用,1表示使用
- -sample 表示 采样的阈值,如果一个词在训练样本中出现的频率越大,那么就越会被采样
- -binary 表示输出的结果文件是否采用二进制存储,0表示不使用(即普通的文本存储,可以打开查看),1表示使用,即vectors.bin的存储类型
- -threads 20 线程数
- -iter 15 迭代次数
除了上面所讲的参数,还有:
- -alpha 表示 学习速率
- -min-count 表示设置最低频率,默认为5,如果一个词语在文档中出现的次数小于该阈值,那么该词就会被舍弃
- -classes 表示词聚类簇的个数,从相关源码中可以得出该聚类是采用k-means
计算相似词
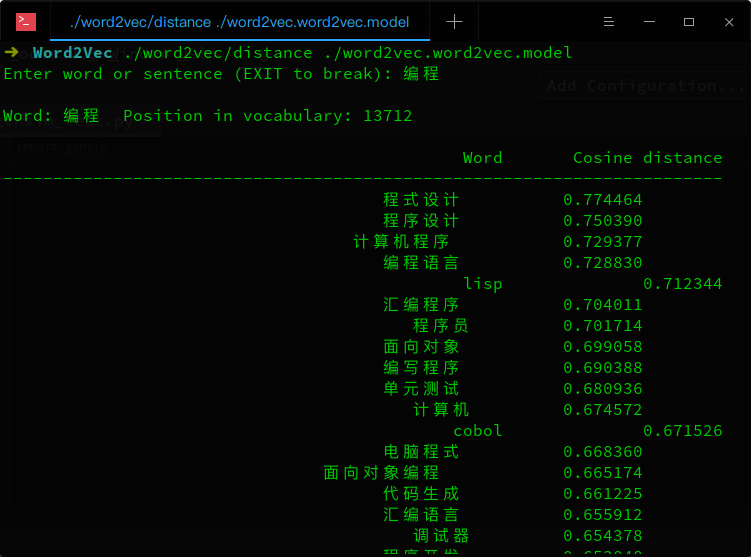
./distance可以看成计算词与词之间的距离,把词看成向量空间上的一个点,distance看成向量空间上点与点的距离。
|
1 |
$ ./word2vec/distance ./word2vec.word2vec.model |
词语类比
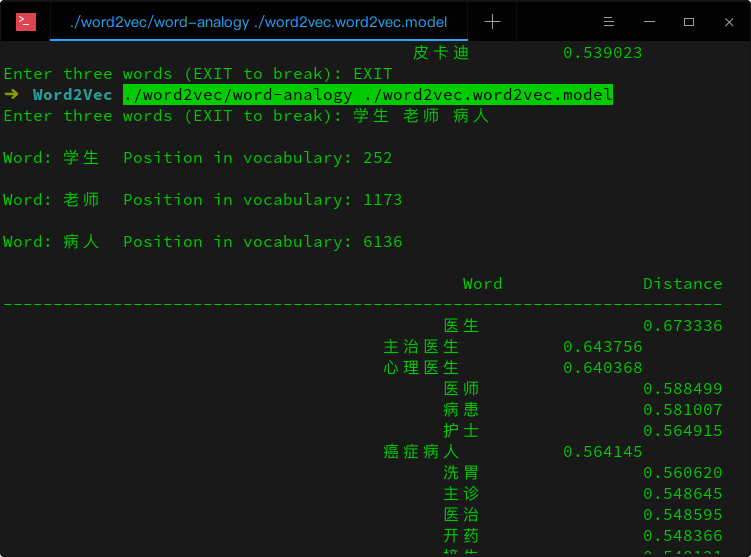
给定三个词语A、B、C,返回(A – B + C)语义最近的词语及相似列表
|
1 |
$ ./word2vec/word-analogy ./word2vec.word2vec.model |
聚类
将经过分词后的语料中的词聚类并按照类别排序:
|
1 |
$ nohup ./word2vec -train resultbig.txt -output classes.txt -cbow 0 -size 200 -window 5 -negative 0 -hs 1 -sample 1e-3 -threads 12 -classes 500 & sort classes.txt -k 2 -n > classes_sorted.txt |
短语分析
先利用经过分词的语料得出包含词和短语的文件phrase.txt,再训练该文件中词与短语的向量表示。
|
1 2 3 |
$ ./word2phrase -train resultbig.txt -output sogouca_phrase.txt -threshold 500 -debug 2 $ ./word2vec -train sogouca_phrase.txt -output vectors_sogouca_phrase.bin -cbow 0 -size 300 -window 10 -negative 0 -hs 1 -sample 1e-3 -threads 8 -binary 1 |
Python版的Word2Vec
项目地址:https://github.com/danielfrg/word2vec
安装:pip install word2vec
整体使用和C语言版类似:
|
1 2 3 4 5 6 7 8 9 10 11 12 13 14 15 16 17 18 19 20 21 22 23 24 25 26 27 28 29 30 31 32 33 34 35 36 37 38 39 40 41 42 43 44 45 46 47 48 49 50 51 52 |
import word2vec # word2vec.word2phrase('data/mytext', 'data/mytext-phrases', verbose=True) word2vec.word2vec('data/mytext', 'data/mytext.bin',size=200, verbose=True,threads=4,sample=0,min_count=0) # word2vec.word2clusters('data/mytext', 'data/mytext-clusters.txt', 100, verbose=True) 默认参数及可传入的值: def word2vec(train, output, size=100, window=5, sample='1e-3', hs=0, negative=5, threads=12, iter_=5, min_count=5, alpha=0.025, debug=2, binary=1, cbow=1, save_vocab=None, read_vocab=None, verbose=False): """ word2vec execution Parameters for training: train <file> Use text data from <file> to train the model output <file> Use <file> to save the resulting word vectors / word clusters size <int> Set size of word vectors; default is 100 window <int> Set max skip length between words; default is 5 sample <float> Set threshold for occurrence of words. Those that appear with higher frequency in the training data will be randomly down-sampled; default is 0 (off), useful value is 1e-5 hs <int> Use Hierarchical Softmax; default is 1 (0 = not used) negative <int> Number of negative examples; default is 0, common values are 5 - 10 (0 = not used) threads <int> Use <int> threads (default 1) min_count <int> This will discard words that appear less than <int> times; default is 5 alpha <float> Set the starting learning rate; default is 0.025 debug <int> Set the debug mode (default = 2 = more info during training) binary <int> Save the resulting vectors in binary moded; default is 0 (off) cbow <int> Use the continuous back of words model; default is 1 (skip-gram model) save_vocab <file> The vocabulary will be saved to <file> read_vocab <file> The vocabulary will be read from <file>, not constructed from the training data verbose Print output from training |
Python包Gensim
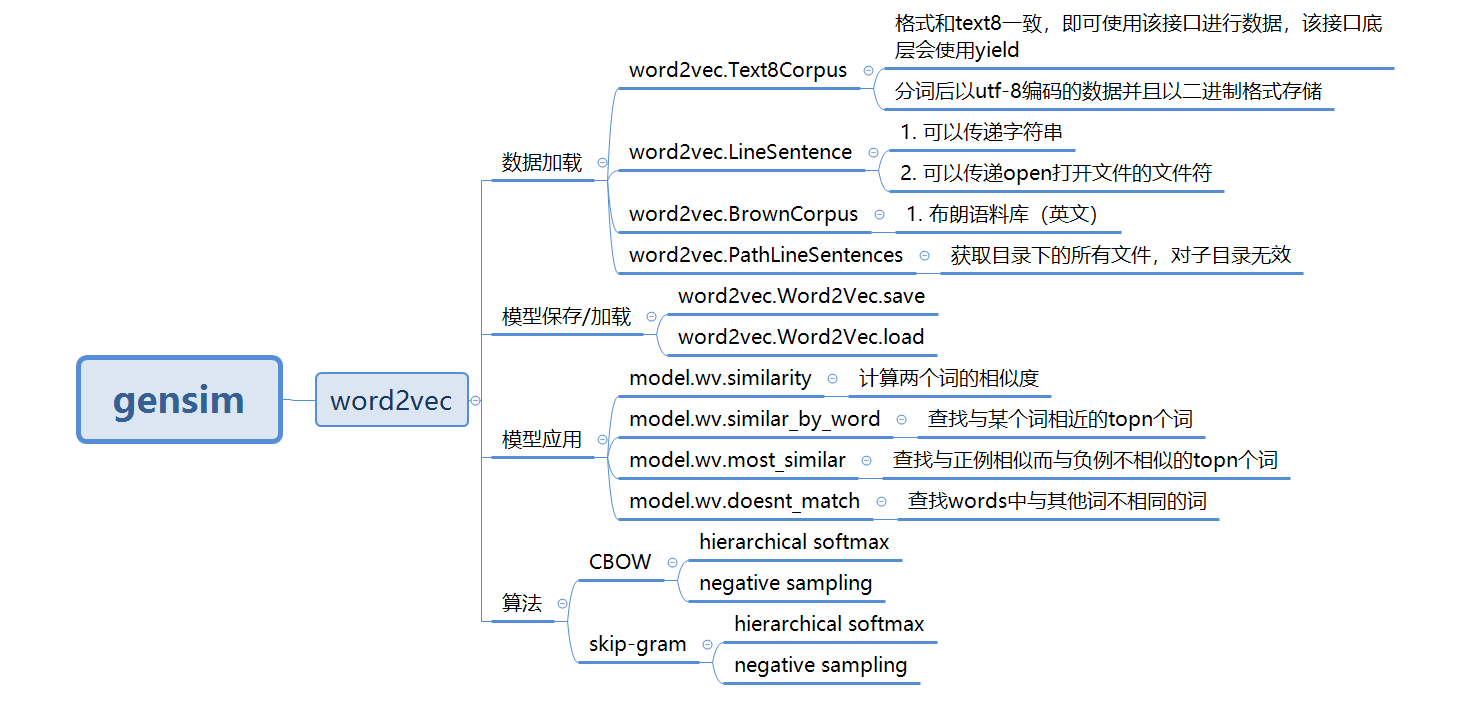
gensim是一个很好用的Python NLP的包,不光可以用于使用word2vec,还有很多其他的API可以用。它封装了google的C语言版的word2vec。当然我们可以可以直接使用C语言版的word2vec来学习,但是个人认为没有gensim的python版来的方便。安装gensim是很容易的,使用”pip install gensim”即可。
项目地址:https://github.com/RaRe-Technologies/gensim
gensim提供的word2vec主要功能:
在gensim中,word2vec 相关的API都在包gensim.models.word2vec中。和算法有关的参数都在类gensim.models.word2vec.Word2Vec中。算法需要注意的参数有:
- sentences: 我们要分析的语料,可以是一个列表,或者从文件中遍历读出。后面我们会有从文件读出的例子。
- size: 词向量的维度,默认值是100。这个维度的取值一般与我们的语料的大小相关,如果是不大的语料,比如小于100M的文本语料,则使用默认值一般就可以了。如果是超大的语料,建议增大维度。
- window:即词向量上下文最大距离,这个参数在我们的算法原理篇中标记为,window越大,则和某一词较远的词也会产生上下文关系。默认值为5。在实际使用中,可以根据实际的需求来动态调整这个window的大小。如果是小语料则这个值可以设的更小。对于一般的语料这个值推荐在[5,10]之间。
- sg: 即我们的word2vec两个模型的选择了。如果是0, 则是CBOW模型,是1则是Skip-Gram模型,默认是0即CBOW模型。
- hs: 即我们的word2vec两个解法的选择了,如果是0, 则是Negative Sampling,是1的话并且负采样个数negative大于0, 则是Hierarchical Softmax。默认是0即Negative Sampling。
- negative:即使用Negative Sampling时负采样的个数,默认是5。推荐在[3,10]之间。这个参数在我们的算法原理篇中标记为neg。
- cbow_mean: 仅用于CBOW在做投影的时候,为0,则算法中的为上下文的词向量之和,为1则为上下文的词向量的平均值。在我们的原理篇中,是按照词向量的平均值来描述的。个人比较喜欢用平均值来表示,默认值也是1,不推荐修改默认值。
- min_count:需要计算词向量的最小词频。这个值可以去掉一些很生僻的低频词,默认是5。如果是小语料,可以调低这个值。
- iter: 随机梯度下降法中迭代的最大次数,默认是5。对于大语料,可以增大这个值。
- alpha: 在随机梯度下降法中迭代的初始步长。算法原理篇中标记为,默认是0.025。
- min_alpha: 由于算法支持在迭代的过程中逐渐减小步长,min_alpha给出了最小的迭代步长值。随机梯度下降中每轮的迭代步长可以由iter,alpha, min_alpha一起得出。这部分由于不是word2vec算法的核心内容,因此在原理篇我们没有提到。对于大语料,需要对alpha, min_alpha,iter一起调参,来选择合适的三个值。
以上就是gensim word2vec的主要的参数,可以看到相关的参数与C语言的版本类似。最简单的示例:
|
1 2 3 4 5 6 7 8 9 10 11 12 13 14 15 16 17 18 19 |
# 引入 word2vec from gensim.models import word2vec # 引入日志配置 import logging logging.basicConfig(format='%(asctime)s : %(levelname)s : %(message)s', level=logging.INFO) # 引入数据集 raw_sentences = ["the quick brown fox jumps over the lazy dogs", "yoyoyo you go home now to sleep"] # 切分词汇 sentences = [s.split() for s in raw_sentences] # 构建模型 model = word2vec.Word2Vec(sentences, min_count=1) # 进行相关性比较 print(model.wv.similarity('dogs', 'you')) |
使用小说《人民的名义》作为语料进行训练:
|
1 2 3 4 5 6 7 8 9 10 11 12 13 14 15 16 17 18 19 20 21 22 23 24 25 26 27 28 29 30 31 32 33 34 35 36 37 38 39 40 41 42 43 44 45 46 47 48 49 50 51 52 53 54 55 56 57 58 59 60 61 62 63 64 65 66 67 68 69 70 71 72 73 74 75 76 77 78 79 80 81 82 83 84 85 86 87 88 89 90 91 92 93 94 95 96 97 98 99 100 |
# -*- coding:utf-8 -*- import jieba from gensim.models import word2vec jieba.suggest_freq('沙瑞金', True) jieba.suggest_freq('田国富', True) jieba.suggest_freq('高育良', True) jieba.suggest_freq('侯亮平', True) jieba.suggest_freq('钟小艾', True) jieba.suggest_freq('陈岩石', True) jieba.suggest_freq('欧阳菁', True) jieba.suggest_freq('易学习', True) jieba.suggest_freq('王大路', True) jieba.suggest_freq('蔡成功', True) jieba.suggest_freq('孙连城', True) jieba.suggest_freq('季昌明', True) jieba.suggest_freq('丁义珍', True) jieba.suggest_freq('郑西坡', True) jieba.suggest_freq('赵东来', True) jieba.suggest_freq('高小琴', True) jieba.suggest_freq('赵瑞龙', True) jieba.suggest_freq('林华华', True) jieba.suggest_freq('陆亦可', True) jieba.suggest_freq('刘新建', True) jieba.suggest_freq('刘庆祝', True) def preprocess_in_the_name_of_people(): with open("data/in_the_name_of_people.txt", mode='rb') as f: doc = f.read() doc_cut = jieba.cut(doc) result = ' '.join(doc_cut) result = result.encode('utf-8') with open("data/in_the_name_of_people_cut.txt", mode='wb') as f2: f2.write(result) # 使用Text8Corpus 接口加载数据 def train_in_the_name_of_people(): sent = word2vec.Text8Corpus(fname="data/in_the_name_of_people_cut.txt") model = word2vec.Word2Vec(sentences=sent) model.save("data/in_the_name_of_people.model") # 使用 LineSentence 接口加载数据 def train_line_sentence(): with open("data/in_the_name_of_people_cut.txt", mode='rb') as f: sent = word2vec.LineSentence(f) model = word2vec.Word2Vec(sentences=sent) model.save("data/line_sentnce.model") # 使用 PathLineSentences 接口加载数据 def train_PathLineSentences(): # 传递目录,遍历目录下的所有文件 sent = word2vec.PathLineSentences("./data/") print(sent) model = word2vec.Word2Vec(sentences=sent) model.save("data/PathLineSentences.model") # 数据加载与训练分开 def train_left(): sent = word2vec.Text8Corpus(fname="data/in_the_name_of_people_cut.txt") # 定义模型 model = word2vec.Word2Vec() # 构造词典 model.build_vocab(sentences=sent) # 模型训练 model.train(sentences=sent, total_examples=model.corpus_count, epochs=model.epochs) model.save("data/left.model") if __name__ == "__main__": preprocess_in_the_name_of_people() # 模型加载与使用 train_in_the_name_of_people() model = word2vec.Word2Vec.load("data/in_the_name_of_people.model") print(model.wv.most_similar("吃饭")) print(model.wv.similarity("省长", "省委书记")) train_line_sentence() model2 = word2vec.Word2Vec.load("data/line_sentnce.model") print(model2.wv.similarity("李达康", "市委书记")) top3 = model2.wv.similar_by_word(word="李达康", topn=3) print(top3) # 报编码错误,暂时未找到原因 # train_PathLineSentences() # model3 = word2vec.Word2Vec.load("data/PathLineSentences.model") # print(model3.similarity("李达康", "书记")) # print(model3.wv.similarity("李达康", "书记")) # print(model3.wv.doesnt_match(words=["李达康", "高育良", "赵立春"])) train_left() model4 = word2vec.Word2Vec.load("data/left.model") print(model4.wv.similarity("李达康", "书记")) print(model.wv.doesnt_match(u"沙瑞金 高育良 李达康 刘庆祝".split())) |
总结
以上为使用Word2Vec训练词向量的流程,你可以自己训练后应用到生产环境中。除了维基百科的语料,另外也可以使用搜狗开源的新闻语料。另外更加推荐腾讯放出词向量数据(已跑好的模型)。该数据包含800多万中文词汇,相比现有的公开数据,在覆盖率、新鲜度及准确性上大幅提高。
其他资料:
腾讯词向量数据的使用
|
1 2 3 4 5 6 7 8 9 10 11 12 |
# -*- coding:utf-8 -*- from gensim.models import KeyedVectors file = 'Tencent_AILab_ChineseEmbedding.txt' wv_from_text = KeyedVectors.load_word2vec_format(file, binary=False) wv_from_text.save('Tencent_AILab_ChineseEmbedding.bin') model = KeyedVectors.load('Tencent_AILab_ChineseEmbedding.bin') print(model.most_similar(positive=['女', '国王'], negative=['男'], topn=1)) print(model.doesnt_match("上海 成都 广州 北京".split(" "))) print(model.similarity('女人', '男人')) print(model.most_similar('特朗普', topn=10)) print(model.n_similarity(["中国","北京"],["俄罗斯","莫斯科"])) |
总体老说腾讯 AI Lab 开源的这份中文词向量的覆盖度比较高,精度也比较高。但是词向量里含有大量停用词,导致文件比较大加载速度较慢(数分钟),而且内存消耗较大,实际使用时根据场景需要裁剪以节省性能。由于这个词向量就是按照训练的词频进行排序的,前100w就能把我们的常用词覆盖到了。这里有已经裁剪好的数据:https://github.com/cliuxinxin/TX-WORD2VEC-SMALL
Tencent_AILab_ChineseEmbedding读入与高效查询
比较常见的读入方式:
|
1 2 3 4 5 6 7 8 9 10 11 12 13 14 15 16 |
import numpy as np def load_embedding(path): embedding_index = {} f = open(path,encoding='utf8') for index,line in enumerate(f): if index == 0: continue values = line.split(' ') word = values[0] coefs = np.asarray(values[1:],dtype='float32') embedding_index[word] = coefs f.close() return embedding_index load_embedding('Tencent_AILab_ChineseEmbedding.txt') |
这样纯粹就是以字典的方式读入,当然用于建模没有任何问题,但是笔者想在之中进行一些相似性操作,最好的就是重新载入gensim.word2vec系统之中,但载入时可能发生如下报错:
|
1 |
ValueError: invalid vector on line 418987 (is this really the text format?) |
仔细一查看,发现原来一些词向量的词就是数字,譬如-0.2121或 57851,所以一直导入不进去。只能自己用txt读入后,删除掉这一部分,保存的格式参考下面。
|
1 2 3 4 5 |
5 4 是 -0.119938 0.042054504 -0.02282253 -0.10101332 中国人 0.080497965 0.103521846 -0.13045108 -0.01050107 你 -0.0788643 -0.082788676 -0.14035964 0.09101376 我 -0.14597991 0.035916027 -0.120259814 -0.06904249 |
第一行是一共5个词,每个词维度为4.
然后清洗完毕之后,就可以读入了:
|
1 |
wv_from_text = gensim.models.KeyedVectors.load_word2vec_format('Tencent_AILab_ChineseEmbedding_refine.txt',binary=False) |
但是又是一个问题,占用内存太大,导致不能查询相似词:
|
1 |
wv_from_text.init_sims(replace=True) # 神奇,很省内存,可以运算most_similar |
该操作是指model已经不再继续训练了,那么就锁定起来,让Model变为只读的,这样可以预载相似度矩阵,对于后面得相似查询非常有利。
未知词、短语向量补齐与域内相似词搜索
未知词语、短语的补齐手法是参考FastText的用法,当出现未登录词或短语的时候,会:先将输入词进行n-grams,然后去词表之中查找,查找到的词向量进行平均。
主要函数可见:
|
1 2 3 4 5 6 7 8 9 10 11 12 13 14 15 16 17 18 19 20 21 22 23 24 25 26 27 28 29 30 31 32 33 34 35 36 37 38 39 40 41 42 43 44 45 46 47 |
import numpy as np def compute_ngrams(word, min_n, max_n): #BOW, EOW = ('<', '>') # Used by FastText to attach to all words as prefix and suffix extended_word = word ngrams = [] for ngram_length in range(min_n, min(len(extended_word), max_n) + 1): for i in range(0, len(extended_word) - ngram_length + 1): ngrams.append(extended_word[i:i + ngram_length]) return list(set(ngrams)) def wordVec(word,wv_from_text,min_n = 1, max_n = 3): ''' ngrams_single/ngrams_more,主要是为了当出现oov的情况下,最好先不考虑单字词向量 ''' # 确认词向量维度 word_size = wv_from_text.wv.syn0[0].shape[0] # 计算word的ngrams词组 ngrams = compute_ngrams(word,min_n = min_n, max_n = max_n) # 如果在词典之中,直接返回词向量 if word in wv_from_text.wv.vocab.keys(): return wv_from_text[word] else: # 不在词典的情况下 word_vec = np.zeros(word_size, dtype=np.float32) ngrams_found = 0 ngrams_single = [ng for ng in ngrams if len(ng) == 1] ngrams_more = [ng for ng in ngrams if len(ng) > 1] # 先只接受2个单词长度以上的词向量 for ngram in ngrams_more: if ngram in wv_from_text.wv.vocab.keys(): word_vec += wv_from_text[ngram] ngrams_found += 1 #print(ngram) # 如果,没有匹配到,那么最后是考虑单个词向量 if ngrams_found == 0: for ngram in ngrams_single: word_vec += wv_from_text[ngram] ngrams_found += 1 if word_vec.any(): return word_vec / max(1, ngrams_found) else: raise KeyError('all ngrams for word %s absent from model' % word) vec = wordVec('千奇百怪的词向量',wv_from_text,min_n = 1, max_n = 3) # 词向量获取 wv_from_text.most_similar(positive=[vec], topn=10) # 相似词查找 compute_ngrams函数是将词条N-grams找出来,譬如: compute_ngrams('萌萌的哒的',min_n = 1,max_n = 3)>>> ['哒', '的哒的', '萌的', '的哒', '哒的', '萌萌的', '萌的哒', '的', '萌萌', '萌'] |
从词向量文件中提取词语生成自定义词库
主要应用场景:分词。(如果觉得词库太大,可以选择TOP N,目前词表是按热度排序的,所以处理起来很方便)
|
1 2 3 4 5 6 7 8 9 10 11 12 13 14 15 16 17 18 19 20 21 22 23 24 25 26 27 28 29 30 31 32 33 34 35 36 37 38 39 40 41 42 43 44 45 |
from tqdm import tqdm import re def gen_dict(input_file, output_file): output_f = open(output_file, 'a', encoding='utf8') with open(input_file, "r", encoding='utf-8') as f: header = f.readline() vocab_size, vector_size = map(int, header.split()) for i in tqdm(range(vocab_size)): line = f.readline() word = line.split(' ')[0] output_f.write(word + '\n') output_f.close() f.close() def gen_dict_with_chinese(input_file, output_file): pattern = re.compile("[\u4e00-\u9fa5]") output_f = open(output_file, 'a', encoding='utf8') with open(input_file, "r", encoding='utf-8') as f: lines = f.readlines() for line in tqdm(lines): line = line.strip() if re.findall(pattern, line): output_f.write(line + "\n") output_f.close() def gen_dict_small(input_file, output_file, size=10000): output_f = open(output_file, 'a', encoding='utf8') with open(input_file, "r", encoding='utf-8') as f: f.readline() output_f.write(str(size) + " 200\n") for i in tqdm(range(size)): line = f.readline() output_f.write(line) output_f.close() f.close() if __name__ == "__main__": # gen_dict('./Tencent_AILab_ChineseEmbedding.txt', # './dict.txt') # gen_dict_with_chinese('./dict.txt', './dict-no-alnum.txt') gen_dict_small(r'D:\ProgramData\Tencent_AILab_ChineseEmbedding.txt', 'dict_10000.txt', 10000) |
参考链接:https://blog.csdn.net/sinat_26917383/article/details/83999966


